I just realized that in writing about the level design of Castlevania, I have inadvertently ripped off Glass Knuckle’s A Critical Look At Mega Man Stages thread. I am a talentless hack. But you already knew that, I assume.

Image cropped from neoseeker.com
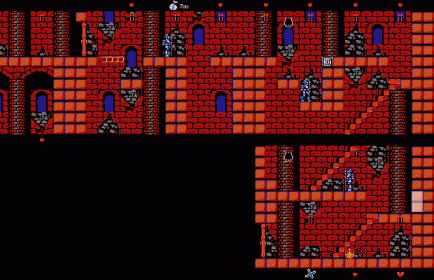
With its second set of stages — each level in Castlevania comes divided into three stages, or blocks if you prefer, separated by doors — Castlevania begins taking off its kid gloves and punching in earnest. There’s a small chance a first-time player could have died in the first three blocks, most likely by getting hung up in the cellar and letting a fish man’s fireball knock them into the water. But a beginner will almost certainly lose a life (or several) here; the hazards come more plentifully and more deadly.
From the beginning, you’ll find the danger level has been escalated over that of the first three blocks. The first enemies you’ll face are not the mindless, hit-and-forget zombies of Stage 01. Instead, Stage 04 is patrolled by armored knights who take several blows to down. And should you fall into a pit or get snagged on the scenery and fall to infinitely spawning bats, you’ll make the unpleasant discovery that Simon Belmont always begins each new life with that puny leather whip that you upgraded before even entering the castle in Stage 00. This means that once you die you’ll be reduced to an even weaker state than when you succumbed to the castle’s threats and have to work nearly twice as hard to take down stronger foes like the spear knights.
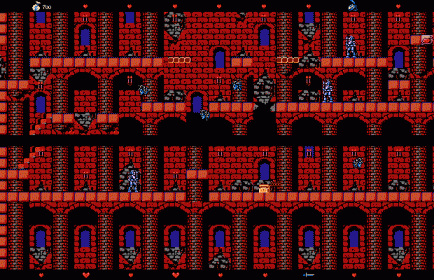
While the spear knights shouldn’t pose much challenge in Stage 04, as each patrols an isolated piece of ground and can be taken on from a safe distance, Stage 05 offers no such clemency. Here, though, the threat comes not from the strong enemies but rather from the weak ones: Medusa makes her debut, and you will hate her forever. The true deviousness of Konami’s designers comes to the fore here as the player is suddenly forced to contend not only with several expanses of open pit (instantly fatal), but also with moving platforms (introduced to harmless effect in Stage 04 but now the mandatory footpath to circumnavigating the aforementioned pits) as well. The timing of moving across the floating platforms wouldn’t be too difficult, even with Simon Belmont’s rather, er, methodical stride, but the whole affair is quickly complicated by the sudden arrival of infinitely spawning Medusa Heads.

Like every other threat in Stage 05, Medusa Heads aren’t completely without precedent; Stage 02 introduced players to the fundamental concept with the bats. Like Medusa Heads, bats spawn infinitely and move in a sine-wave pattern. The difference between the two is that bats drift lazily and spawn infrequently. Medusa Heads fly swiftly, describe a shorter wavelength (meaning they move up and down out of the player’s limited forward attack radius rather quickly), and regenerate rapidly. It’s not simply enough to get down the timing of the moving blocks here; you also need to learn the flight plans of Medusa Heads and make your moves accordingly. They’re maddening, but they’re not impossible to overcome. You can manipulate how they come into play by leaping straight up as one is about to appear, forcing it to spawn above you and allowing you to duck and let it sail harmlessly overhead. Really, though, the best trick is to jump forward onto a platform and toward an oncoming Medusa Head just as it begins to ascend, whipping as you jump. You’ll destroy the enemy and pass harmlessly through the space it only recently occupied. This takes a bit of nerve and isn’t an entirely intuitive action, of course. This is the first true test of Castlevania. And even so, it isn’t unfair: The pits themselves are fairly small, and the moving platforms traverse the upper level, meaning that if you’re knocked back it’s not a guaranteed death — more likely a “climb up and do it again” sort of annoyance.
Of course, some people simply cheat and abuse game physics by letting the impact recoil of a collision with an enemy — really intended to send Simon hurtling into a pit should he fail to take down an approaching Medusa — lift them to the platform directly above the entrance to the platform room. This allows them to circumvent the entire challenge. Dirty pool, but effective.

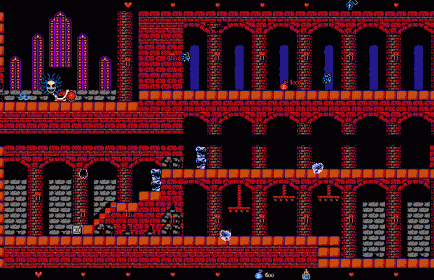
Stage 06 continues the harshness with collapsing ceilings that will kill Simon instantly on contact. There are only three of them, but they come in rapid succession and leave no room for error. Thankfully they’re right at the start of the stage — die and you don’t have to fight your way back for another attempt — but they require good timing and a bit of nerve. Again, enemies harass you inconveniently here: Ghosts drift toward you slowly but from an oblique angle, forcing you to deal with them aggressively lest they knock you into the ceiling traps and you die. Ghosts require several hits to deal with, too, so you’ll need to land more than just a single lucky blow against each. Once you’ve cleared the pit trap, you’ll have to take on the deadly dragon skull cannon, a two-tiered projectile launcher than can face either direction, fire high or low, and requires multiple hits to dispatch. Dangerous, but not so bad here: You can attack from the stairs, which leaves you less vulnerable, and there’s a weapon multiplier immediately below to increase your offensive capabilities and let you take it down quickly.
The final sequence pits players against a hall of Medusa Heads, which is more intimidating than it is dangerous: Since it plays out over solid ground, it’s easy enough to avoid the monsters altogether. And at the very end, the brown stone gives way to a unique chamber decorated with steepled stain glass windows and a large statue of a Medusa Head. The statue suddenly comes to life, revealing itself as the boss: The real Medusa, who sends snakes along the ground toward Simon as she floats around the room. Maddening as her progeny may be, however, Medusa herself is quite simply the easiest boss in the game, vulnerable not only to multiplied Holy Water attacks (which freeze her in her tracks as they burn away and can completely stun-lock her with the multiplier’s overlap) but also to the Stopwatch, which completely immobilizes her.
All in all, though, Stages 04 through 06 represent some extraordinarily thoughtful game design. The challenge grows progressively steeper as you advance, yet never unfairly and never without precedent. Everything you learn here proves to be a vital piece of knowledge for the subsequent adventure, too. The only downside is the laughable simplicity of the boss, but consider Medusa the game’s final act of clemency before truly baring its fangs.
It’s surprising how much thought actually went into these stages. I’ve always loved the game, but it took me years before I could actually legitimately beat the game. It’s consistently in the process of honing your skills, until eventually you just _get_ it.
That last stage, though? It feels really, really cheap. Or maybe I just didn’t learn enough by that point. Who knows? I did finally learn the secret to taking down Drac, though, which counts for something.
I’m really looking forward to more of these, and especially your thoughts as the game really puts the pressure on the player.
Wait, you can really let yourself get knocked up onto a platform and circumvent that whole part of the stage? I had no idea (this is what I get for never having read that installment of “How To Win At Nintendo Games” or whatever the hell those books were called).
Everything else aside, look at those lurid colors in these Castlevania stages - it’s like something from a Basil Gogos “Famous Monsters of Film Land” painting. I’m working on a homebrew map of the first Castlevania game for release this October and my first inclination was to make it a monochromatic map (to look like a hand-drawn map from the 17th century) but I’m torn between that and figuring out a way to inject some punky colors into the imagery so it retains that classic CV1 vibe.
Man, I love what having such a limited color palette did to 8-bit game design - Andy Warhol and his neon Elvis’s would’ve been proud.
Just wait ’til we get to level 3’s color palette.
And yeah, getting knocked to the upper ledge is a key speedrun strategy.
How about a hypercolour map?
Funny story, but I didn’t realize you could duck underneath the middle less functional spike press to avoid getting hit until I played the X68000 game’s much more sadistic take on the level in Castlevania Chronicles. I did what I could to avoid getting hit by the spike presses (only to get killed on any non-easy difficulty by Medusa, Broken Glass Man, the wonky collision detection spike column gauntlet, or more insultingly, the bat right after said gauntlet or the skeleton that’s nigh guaranteed to hit you if you don’t have an axe), and when I played the original Castlevania again, I was pleasantly surprised to see it worked there, too.
Speaking of that gauntlet, it’s also one of the more irritating places to get through without taking damage for anyone not around Simon height in Harmony of Despair’s entirety of Castlevania DLC stage.
is the music. The first is iconic, the third brilliant, the fourth creepy and the fifth is the best of them all. The final one I can’t remember, I’m always so stressed about surviving.