So this is where Castlevania gets mean. The Medusa Heads seemed maddening, but they were really just a warm-up for what’s to come. After the first two level sets, you’ve come to terms with the core mechanics of the game and hopefully found the “rhythm” by which Castlevania works. So, now the game completely destroys all that you’ve learned.
 Again, stolen from neoseeker.com
Every enemy and challenge in the first 06 stages of Castlevania works by a simple set of rules, and once you get a feel for those laws you can take them on easily enough. The deadliest hazards — the moving platforms, the falling ceilings — operate on strict timing. Even the Medusa Heads spawn predictably and move in a tricky yet regular pattern.
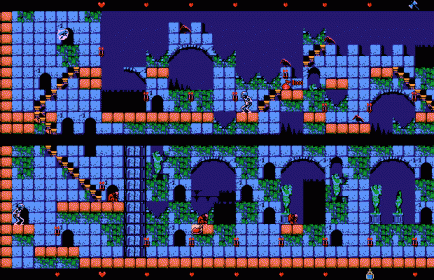
The second you set foot into Stage 07, all of that goes out the window. Alucard can say what he likes about the castle itself being a creature of Chaos, but be that as it may the first three foes you face here — the Fleamen, also sometimes called Igors for reasons that shall become apparent later — are the high priests of Chaos. They move quickly, erratically, and are tiny enough to be difficult to hit. Simon moves methodically and can only attack straight ahead (supplemented by whichever sub-weapon he happens to be holding). These little guys will become your bane. Before you come within whip range, they begin to twitch and move and then leap in high arcs; once they land they may leap again, but maybe not. Maybe they’ll duck back out of range. Maybe they’ll bum rush you. It’s hard to know what they’ll do and difficult to hit them even if you do. Fleamen are the worst.
Once you survive their aggression — and you’ll note hidden meat in only the second set of blocks here, a sign of clemency from designers who know they’ve just kicked your butt right out of the gates — you have to contend with another new foe, a skeleton. While not as hard to pin down as Fleamen, skeletons can be tough, too: They leap around, always trying to skirt around Simon’s attack radius, while chucking bones in lazy arcs that can only properly be countered by the Axe subweapon. Once you climb to the area above, you’ll face your first true platforming challenge with stairs and blocks over the largest expanses of instantly fatal pits yet to appear. The primary antagonists here are crows and skeletons, neither particular deadly on their own but quite effective in combination. While skeletons harass you with their projectiles, crows rise from their perches away from Simon (and thus out of whip range) before making a straight dash toward him and boomeranging back along the same trajectory. They’re easy enough to take down as they make their beeline… unless you’re busy dodging a lobbed femur, in which case they’ll probably slam you into a pit.

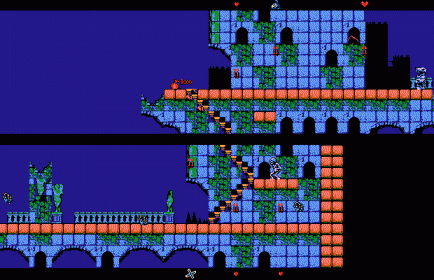
Stage 08 provides something akin to a respite. It’s more or less a straight shot across flat ground with few environmental hazards, and the return of Medusa Heads after Stage 07’s crazy dangers feels almost like a relief. Of course, this time you have other enemies to deal with as the Medusa Heads bob their way toward you, but it’s nothing too overwhelming. The biggest challenge is a pair of dragon skull cannons, the second of which can potentially knock you into a hole with its projectiles, but you’re likely to have a boomerang or stopwatch capable of nullifying the threat anyway.
At this point, you can take a moment to appreciate the game’s environmental design. The color palette, for instance: Where Stages 04-06 were set in the castle’s candlelit interiors, reflected with a warm brown color scheme, Stages 07-09 span the exterior of the castle and use a two-tone blue scheme to denote darkness of night and moonlight. The high-contrast orange blocks make it easy to see which ground is safe while suggesting illumination from the candelabras that provide your power-ups.
Equally impressive is the consistency of the game’s architectural design. In a nice bit of detail that appears all too infrequently in 2D games, the “platforming” in Castlevania exists for a reason. The light blue background masonry and the orange foreground blocks match up. The castle’s outlines line up from screen to screen, as you can see in the wall that spans the vertical transition above. Gaps exist because that portion of the path has crumbled, with mossy and vines having grown over ancient divots in the background that correspond to holes in the footpath. The silhouettes of distant walls and parapets give the impression of a much larger structure than the critical path Simon traverses. Castlevania represents one of the first efforts to explore logical (or at least internally consistent) architectural design in a video game, and it really adds a lot to the game.

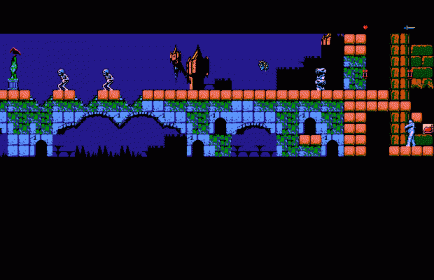
Here’s that design in action again: Stage 09 consists of a lengthy bridge between two portions of the castle. Everything here is amazingly well-considered. The bridge spans multiple arches which have begun to decay with age. Through the arches, you can see distant portions of the castle and even the forest beyond. In fact, Stage 11 and beyond is entirely visible right here: You’ll soon travel through those wooded areas seen through the broken double-width archway, into the lower portion of the building and ultimately up into the tower to fight the final boss in the structure jutting from the main tower at an impossible angle. Of course, you don’t know that the first time you play the game, but the second time through you’ll marvel at the thought that went into such a seemingly incidental one-shot background detail.
This stage presents the player with a sort of amped-up version of Stage 08. The challenges are largely similar, but now the danger level is higher. The game throws practically every big threat to date except the Fleamen at you as you head across the bridge, with the triple-gap over the crumbling span providing several consecutive opportunities for collision recoil to fling you into the deadly void below. Sometimes the idea of death-by-pit feels unconvincing, but in addition to its other functions the background detail here also communicates the idea that it’s a long, long way down.
At the very end, the color palette changes again to warm browns and greens as you enter the castle structure again. This entrance is guarded by two mummies, who definitely represent the toughest foe to date. While they can be incredibly easy to defeat with the proper weapons — a triple-boomerang in particular can take them out almost before they even move, destroying their projectiles in the process — an unprepared adventure can find himself pinned between them and practically stunlocked by the loose wrappings they waft in the player’s direction. As a particularly cruel touch, the game tries to trick you into collecting a dagger as you enter the mummies’ lair, a weak and mostly ineffectual tool in this fight. There’s meat in the blocks should you need it, but even that comes with attendant risks since that area is often occupied by one of the mummies… and even if it wanders right, you risk being knocked into the pit to the left. There’s also strategic value in not collecting the meat, since the block it’s in allows you to jump back up to the entrance and get out of the fray should you need a breather (or if you happen to have an axe or holy water that can be chucked leisurely at the bad guys).
On the whole, a very nice set of levels that gives a proper sense of what the player will be up against in the second half of the journey.
I always thought the Medusa Heads in Stage 08 were more of a way to mess with your head. It’s easy to see them flying at you and think you need to stop, dodge, or whip them, when really you can easily get across that bridge unharmed by moving forward and never stopping until you get to the stairs.
For my money, the crows are the real bastard-coated bastards of this stage.
Well, crows are bastards. Come spring, when they start dive-bombing people in real life, it makes you wish for a good self-defense subweapon.
This was the area where I first realized how coherently the foreground and background designs fit together, finally clueing me in on how the first two areas did it as well. It just makes the slipshod design of CVII’s mansions all the more painful.
This is my favorite level in the original Castlevania. It’s the one I was stuck on for eons as a kid, and when I finally beat it I was so gratified. Then there’s “Wicked Child”, my favorite CV tune of all time…
These are pretty neat articles. I’ve been enjoying them quite a bit. Look forward to the rest!
Wicked Child really is a great tune, and easily one of my faves from the original Castlevania. In the X68000 game, the third block doesn’t have a near direct level analogue (NES Blocks 1 & 5) or a few similar areas (NES Blocks 2 & 6), but its has a pretty awesome remix of Wicked Child for its own third block.
I must admit that although I’ve known Castlevania for some 25 years (a neighbouring kid had it, we still talk about that game!) I never realized that the architecture was made in that way. Thanks about that.
I love the tune too, though I never understood where the names come from. Is the wicked child a hunchback, a raven or a skeleton?
Screw the end of the next stage. Screw the entire stage after that. SCREW THE ENTIRE STAGE AFTER THAT, TOO.
This is really the last part of the game where you can even pretend to feel like a bad-ass from start to finish. After this, any sane player essentially turns into Sam Rockwell’s character from Galaxy Quest.