Once Mega Man destroys all eight of the Robot Masters in his tireless, violent fight for everlasting peace, Dr. Wily makes his appearance, hailing his usual flying saucer to spirit him away to his evil lair. Said evil lair got a very stylish upgrade this time around:
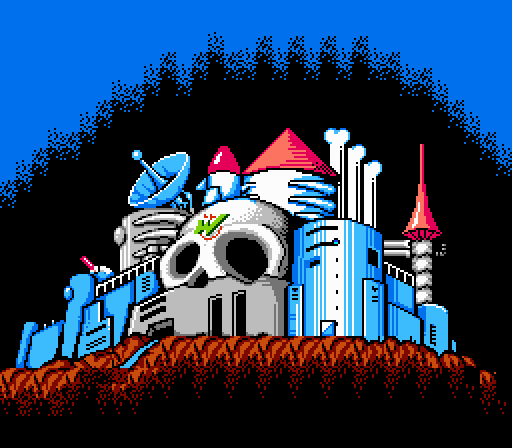
You have to respect a man who dedicated to the cause of tyranny that took the time to construct his ultimate fortress with a dedicated skeleton theme. It’s not just the skull, but also femur-shaped towers and sky bridges, and also ribcage detailing around the central structures, and also a tower in the shape of a spine. Meanwhile, there’s a massive rocket, possibly a huge missile, in the center of the structure. The message is clear: All or nothing.
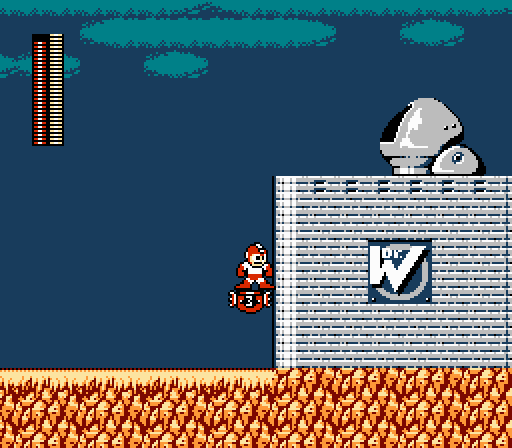
The bone motif doesn’t actually carry over into the interior areas, though. However, this first area does communicate the concept of a defensive structure pretty clearly. You begin by traversing a flat expanse of rock, mount a pair of bunkers, climb the outer fortress wall, and face off against a rather impressive security system once inside.
In keeping with the precedent established in Mega Man, Dr. Wily’s stages incorporate elements of all the Robot Master levels. In their own way, they served as a sort of training ground for the challenges in these final sequences; the reprised mechanics appear in more challenging, complex configurations here, and you’ll find opportunities to make use of every special weapon in turn. In fact, nearly every tool in your arsenal is required at some point; the game expects you to have figured out their use and utility as you face the final gauntlet.
There’s also a sort of endurance element at work here. Whether you attempt to clear all these final stages in a single go or accept defeat and have to press Continue, you’ll face different forms of challenge here. Mega Man’s weapons don’t refill after you complete each stage, so over time the attacks you expend take their toll on your weapon stock. By the time you reach the final boss gauntlet, you may not have enough gun juice to take on the Robot Masters again — to say nothing of Dr. Wily himself.
On the other hand, if you die and continue, you’ll get a weapon recharge… but all the E-Tanks you’ve collected will be lost. Which can make some of the nastier bosses a real drag.
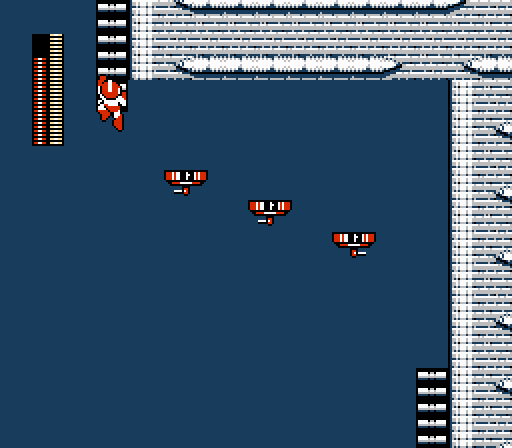
The initial run-up to the fortress pits you against bird bombers, which of course are a cinch to clear out with the Leaf Shield. It’s not the fastest way to progress, but it’s incredibly effective… and efficient in terms of energy use, given the generosity with which those little baby birds drop power capsules.
Items 1 and 3 come in handy here, as you need to scale walls. Item-1 becomes a requirement later in the stage, so an experienced player will probably alternate between 1 and 3 to balance their power drain, but Item-3 proves to be much more practical at the outer fortress wall, with its narrow spaces.
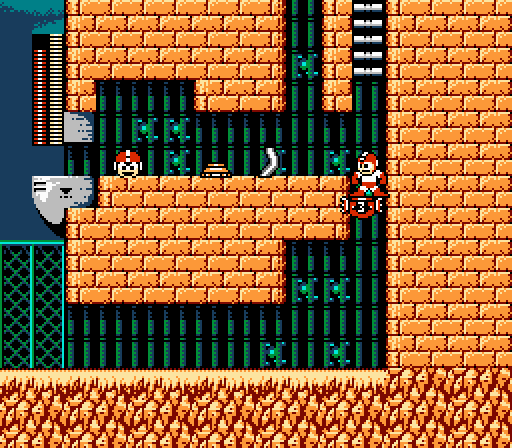
The wall ascent resembles previous climbing sections of the game in that you’re forced to climb toward some sort of threat or hazard. In this case, rather than confronting you with infinitely spawning enemies designed to knock loose your grip on the ladders, the game pits you against a couple of Sniper Joes. The first stands directly adjacent to the ladder, which means you can easily take him out with several of the weapons in your arsenal. You can climb to the very top of the ladder and hit him with Quick Boomerangs while remaining below his line of fire; or you can blast him with the air shooter (which is marvelously effectively against Sniper Joes); or you can just do the diagonal Metal Blade thing.
The second Joe, however, stands much further back from the ladder, which makes him much harder to hit. It’s the same threat arranged in a different way to require a different strategy for each scenario.
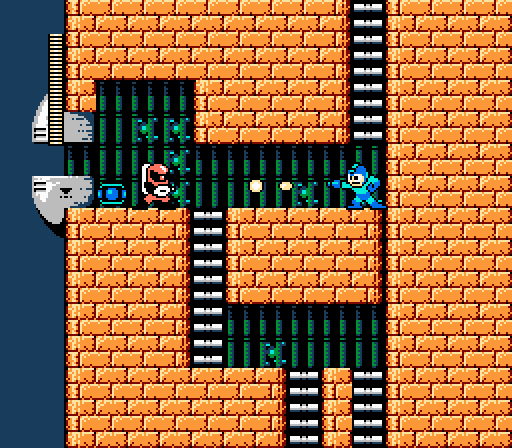
The final stretch of the stage reprises one of Mega Man‘s most infamous sticking points: The point where you need to reach a ladder to the far upper left by means of one of your non-weapon tools. In the original Mega Man, you could reach this point without having found the Magnet Beam, forcing you to exit out of the stage and go hunting for the thing. Here, that’s literally impossible: You can’t exit out of Dr. Wily’s stages, because all Robot Master levels lock down once you conquer them; and you can’t get to Dr. Wily’s stages without having acquired all the extra Items as they’re bundled into three of the levels you have to conquer to reach this point. I wouldn’t be surprised but what the frustrations surrounding the Magnet Beam helped shape these mechanics in Mega Man 2.
Since the challenge here isn’t, “Hey, I hope you collected the item you need” but rather, “Let’s see if you can make this jump,” it’s a long gap you need to clear. Item-1 is the only means you have of making the connection, laying down one and immediately hopping on to it to activate the next. You’ll create a stair-step effect that allows you to just barely reach that last ladder. Three should be enough to do it if you make the jumps just right, though it may be necessary to plant a fourth. A fifth? That’s impossible, because of the rising stair steps; you’ll hit the ceiling.
A small oversight in graphic design: The Items use mirrored sprites depending on your orientation when you place them, with their “proper” direction being left to right. In the one place in the game where Item-1 is absolutely mandatory, however, you’ll be facing left. So the one time in the game you’ll definitely see Item-1, its label is backward. This of course is an utterly trivial detail that doesn’t matter in the least, but it’s always bugged me a little. Which is probably why I grew up to write nitpicky analyses like these.
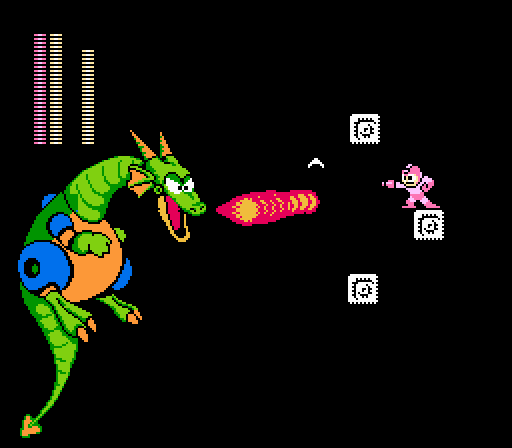
At the very end of the stage, you enter the fortress’ darkened interior, and something unusual happens: The screen begins to scroll forward automatically. Generally speaking, I have very little patience for auto-scrolling sequences, but it works here because it’s used so sparingly and builds up tension for what’s about to come: The battle with Dr. Wily’s Mecha-dragon.
The switchover to auto-scrolling is subtle and surprising. It happens while you’re still on a flat expanse of floor, running ahead with no impediments, so you might not notice that the screen is moving differently until you start to drift from your centered position. Or maybe if you pause to calculate your jump across the gap in the floor.
After a moment, though, the screen pushes ahead, forcing you off of steady ground and onto a series of individual blocks over a black chasm. It’s a nerve-wracking bit of platforming, but it becomes even more distressing once the massive robotic dragon materializes in behind you and begins giving chase. There’s little doubt the dragon is deadly to the touch; as it flies forward, it actually knocks aside the platforms it touches. It literally destroys the level in a way not yet seen in Mega Man. Sure, you can break special blocks with the right weapon, but the Mecha-dragon is so powerful it smashes all it touches.
Eventually, the scrolling stops and the Mecha-dragon battle begins. As with standard bosses, the appearance and completion of its health bar serves as your indicator that the fight has begun. Unlike other bosses, you don’t have a lot of options in this fight; only three bits of footing remain for you to jump around on. The dragon hovers on the left side of the screen, drifting up and down, left and right, and occasionally belching massive blasts of flame at you. Given the tenuous footing, it’s wise to avoid staying still lest the fire knock you into the pit. You’re also wise to avoid the top platform, as it leaves you vulnerable to an instantly fatal collision with the dragon’s head when it drifts to the upper right.
It’s a vexing battle until you figure out the dragon is weak to Quick Boomerang; once you sort that out, you can fire off a rapid string of them and take it down pretty quickly. But the discovery process is tense, leaving you incredibly vulnerable as you experiment with different weapons and try to figure out how to damage the Mecha-dragon. It’s a fight quite unlike any other in the series to date, a tense and high-stakes encounter that announces your transition into the highly difficult endgame…
…but it does so in a much less unreasonably difficult manner than the Yellow Devil of the original Mega Man. The Mecha-dragon serves the same purpose as the Yellow Devil, being a tough first “final” boss that throws you into the most dangerous scenario yet seen in the game. However, its difficulty comes less from unfairly stacking the odds against you with high damage output and a narrow window of attack and instead relies on rattling your nerves with a sequence that seems far deadlier than it actually is. You can get through the auto-scrolling sequence here on your first try if you keep calm, something that can’t reasonably be said of the Yellow Devil’s pattern for any but the most savant of idiots. And once the battle begins in earnest, damaging the Mecha-dragon isn’t a matter of patience and steady performance as much as it is a test of your willingness to experiment.
Capcom used the Mecha-dragon scene for promotional photos back in the day, because it looked like nothing else on the system. But it’s totally in keeping with Mega Man 2‘s overall excellence that it plays as impressively as it looks.
Huh, I never even noticed some of those details about the fortress’ design. I thought the rib-like parts were just sharp claws, and that the back tower was just sort of… not sure of the term. Just tube-like segments stacked, basically. Never imagined it as a spine- that’s pretty cool!
As for the Mecha Dragon, I never had a problem going to the top, insomuch as him attacking head-first goes. I usually go there so that if I get hit by fire, the knockback drops me to the middle platform.
I was going to say the exact same thing. The momentary invincibility after being hit by the Dragon’s fire is enough for it not to kill you with its touch.
That Item-1-gauntlet stopped me completely in my tracks when I was a kid, and I still think it’s kind of difficult. I never noticed the mirroring, though, you really do pay attention, Mr. Parish.
You forgot to mention that pipe on the fotress’ design, which shows up on every single fortress on every megaman game.
The dragon made such a huge impression on me and my best friend growing up that after we reached it for the first time on a candy-and-Pepsi fueled midnight, we feverishly wrote down the code to reach the castle in the back of the rental manual (when those were still a phenomenon). We also drew a picture of the skull fortress and a dragon hovering over it, to encourage other renters of the game to experience this earth-shattering wonder for themselves.
That dragon fight is actually pretty glitchy. If you jump up to the top platform and just start hammering away with the Quick Boomerang, you’ll get hit once and knocked back onto the middle platform. But if you jump back up and keep up the assault, the game bogs down a little, his breath will often phase right through you, and he’s toast before you know it.
I think using the top platform is worth the risk. While there is a risk of being instakilled if the dragon gets up close and personal, there’s more of a chance you’ll get instakilled by knockback sending you flying down into the bottomless void if you only stick to the other two platforms.