Several people have complained in the comments of this series (and elsewhere) about the repetitive nature of the Wily stages in Mega Man 2. Specifically, the fact that the levels are constructed of the same bulkhead panel tile, repeated over and over again in different color schemes.
Interestingly, I never hear those criticisms voiced for the original Mega Man, even though that was the case there as well.

I think we can attribute this to a couple of factors. One, The first Mega Man just isn’t as visually interesting as its sequel — a smaller, more limited game. Some shortcuts seem inevitable in an older game like that, really. Also, the one different Wily stage came in the middle (stage three) in the first game instead of at the beginning (Mega Man 2‘s Wily 1, the fortress exterior, with its multiple mixed surfaces). Secondly, though, despite the smaller ROM size of the older game, the Wily stages do more to mix up the look of the scenery. Mega Man 2‘s final three levels consist of nothing but walls and walls of these same background tiles, with no other machinery or imagery to break things up. The effect does pair nicely with the background music to create a kind of suffocating atmosphere… but a little variety never hurt anyone.
That being said, for all the Wily stages’ visual monotony, each one incorporates its own unique mechanics. We’ve seen hints of Metal Man’s stage, Bubble Man’s, Flash Man’s, and more. For the final leg of the journey, we thankfully don’t have to deal with Quick Man redux. Instead, it’s more a reprise of Crash Man’s level, with some mechanics that have appeared nowhere else in the game.
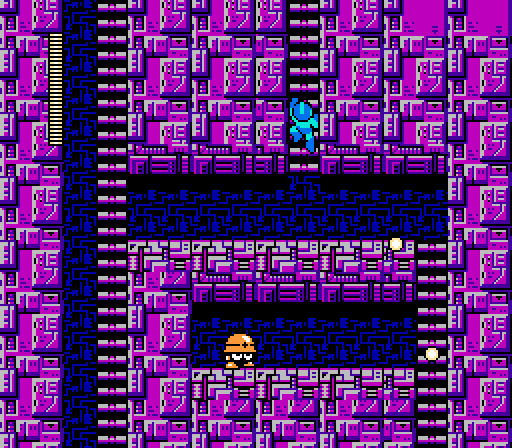
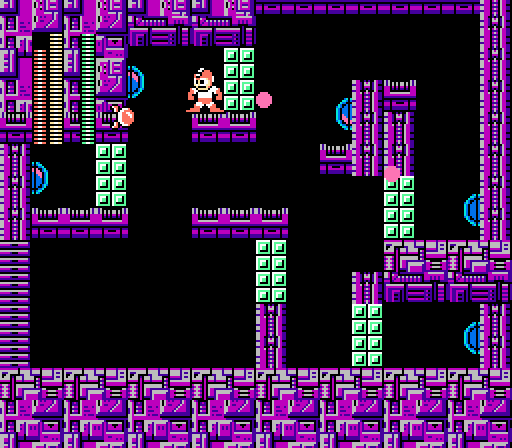
Despite its dense, claustrophobic feel, Wily 4 revisits the ascent element of Crash Man’s stage. You’re navigating a series of ladders here, with strategically placed Metools eager to knock you back down to the previous screen. Those jerks. What makes this area different, however, is the presence of….

…false, holographic floors. Certain panels of floor simply don’t exist, despite the visuals telling you otherwise. Nasty.
But not unfair. The spike trap here isn’t the first you’ll see of the fall-through flooring. The initial ascent with the bulkheads populated by Metools ease you into this new mechanic in a relatively safe environment. You can’t reach this spike pit without first traversing a series of holographic bulkheads, and the game actively entices you to learn more about them by strategically placing a 1UP in a corner that can only be reached by correctly navigating these takeout pits. The worst that can happen here is to fall and hit a Metool — no big deal. So by the time you get to the spikes, you’ve just spent a few minutes plummeting in unexpected places and riding Item-3 past surprise pitfalls. You should expect a trick here.
The solution to this bit of environmental nastiness is right in your arsenal: The Bubble Lead, which clings to the ground and tenacious keeps on clinging even when the ground takes a downward dip, has the ability to roll along safe ground and drop where the pits appear. You still can’t see the pits, but you can deduce their location by watching the behavior of the Bubble Lead.
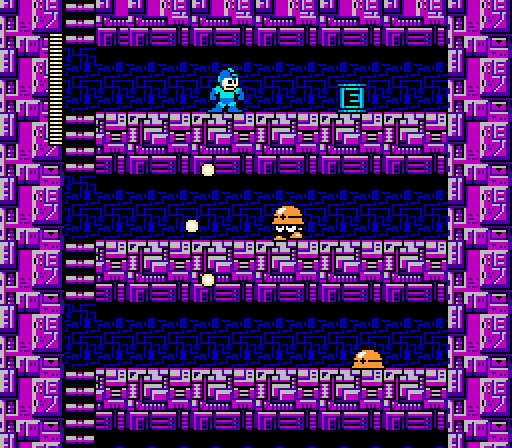
And when you do reach pits, you can either jump over them or, when the ceiling is too low for you to clear that much horizontal space without bumping your head and taking a fall, using Item-3 to stick to the inner lip of one of the pits and create a makeshift platform for you. Alternately, you could ride Item-1 from below the pit. Mega Man 2 revels in its wealth of strategic options.
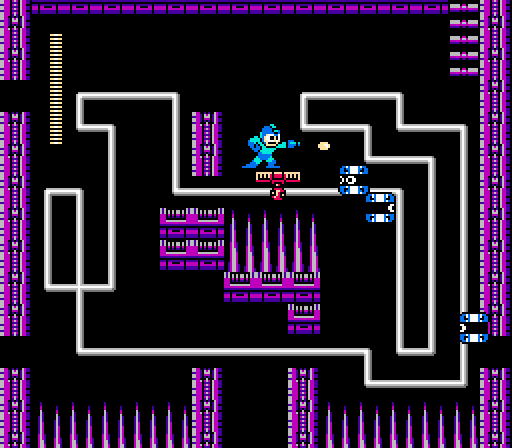
Once you make your way to the top of the pitfall zone, you double back down again for another Crash Man reprise. This time, it’s the on-rails platforms from his stage surrounded by endless swarms of Tellies. In their first appearance, the challenge of these platforms came from the fact that you had to ride them upward to reach ladders at the top of the screen; here, you’re advancing downward. No sweat, right? Gravity’s working in your favor. Alas, it’s not that simple.
For four solid screens, you’re riding the platforms over floors consisting of nothing but spikes. There is very little safe ground here, and many of the rails are surrounded by narrow walls that create far too small a space for Mega Man to ride through. While you can still employ the tactic of riding about while the Leaf Shield protects you, this sequence doesn’t offer any slam dunks like in Crash Man’s stage. You’re forced repeatedly to jump to small stable outcroppings as you wait for the platform to trundle its way through the narrow gaps, and of course every time you jump you’re forced to send the Leaf Shield flying, wasting some of its ammo. There’s a distinct possibility of running out of ammo here, which means you’ll be zipping around the room at high speeds and approaching Tellies from oblique angles, increasingly the likelihood of being knocked into spikes. And no one wants that.
The final stretch of the stage consists of two Returning Sniper Joes on foot and two in mechs. It’s a pretty annoying final gauntlet, since those enemy types tend to be woefully parsimonious with weapon power-up drops… and god knows you’ll probably need them for the boss ahead.
I suppose every Mega Man has to have at least one boss you utterly and completely hate, and the Boobeams here are Mega Man 2‘s universally loathed showdown. It’s an interesting battle, because it was designed explicitly to screw you over.
The wall-mounted cannons here are a mostly passive threat. They sit on the wall, doing nothing, and every 10 seconds or so they change up and all fire an energy bullet simultaneously that zeroes in on Mega Man’s current position. It’s difficult to dodge the converging shots initially, since they move quickly and from almost every angle. Once you start picking off the cannons, however, you can more easily dodge the shots with a well-timed jump.
The problem is that the only way to destroy the cannons is to hit them with a Crash Bomber. Fully energized, you have seven shots with the Crash Bomber, and there are five cannons. Easy, right? Hold on, there, bucko. Two of the cannons are housed behind destructible walls that, again, can only be destroyed with Crash Bombers. Five plus two is seven, which means you need to pull this encounter off without a wasted shot. Well, you can be clever and put a well-placed Crash Bomber on the tile shown here, which will destroy a turret and a key wall in a single shot, but it’s tricky and not intuitive.
Also not intuitive is the fact that you need to conserve your ammo for the essential targets. Your first instinct in entering this room is almost certainly to blow out the destructible wall immediately to the right of the starting area… but once you open fire on the turret in the bottom right corner, you’ll discover it can only be destroyed with the ammo you just wasted. Rather than blow out the wall to the right, the proper approach is to use Item-1 to ride up to the platform above… which isn’t exactly intuitive, either, since taking that ride is likely to leave you vulnerable in the center of the room where the energy beams converge. This encounter appears to be consciously designed to screw over a first-time player by putting them into a situation where they almost invariably won’t be able to finish the fight.
This wouldn’t be so bad if not for the fact that when you die and start again, you’ll be completely drained of Crash Bomber ammo and will have only the churlish Sniper Joe gauntlet with which to recharge your reserves — a scenario almost guaranteed to cost you a ton of health or other weapon reserves in a slow, grindy attempt to top off your Crash Bomber ammo.
The one saving grace of this battle is that walls destroyed with Crash Bomber don’t regenerate until you run out of lives and hit Continue, so as long as you have some Mega Mans in reserve you won’t have to clear out any of the barriers you’ve taken down. One possible strategy here is to blast out all the walls in the room, die, grind for ammo, and quickly take out the Boobeams. But that’s a graceless tactic, and the fact that Mega Man 2 railroads you into it makes this final fortress boss a black mark in an otherwise beautifully designed game.
I didn’t even know it was possible to beat the boss without giving up a life and refilling the Crash Bomber until the YouTube era.
Also:
“And when you do reach pits, you can either jump over them or, when the ceiling is too low for you to clear that much horizontal space without bumping your head and taking a fall, using Item-3 to stick to the inner lip of one of the pits and create a makeshift platform for you. Alternately, you could ride Item-1 from below the pit. Mega Man 2 revels in its wealth of strategic options.”
OR you could just zip over the whole surface with Item-2. So yeah, very cool how many ways there are to get through.
Yeah, I feel like at the very least, they should have made these turrets killable with your standard weapon (albeit maybe taking a large number of bullets to down). Crash Bomber would still be the most effective way to take them out, but you aren’t completely screwed if you run out of ammo. Also maybe remove the two gates blocking off two of the turrets. Or at the very least re-arrange things so there is a path to each turret, if not an easy one (i.e. like the path to the top far-right or top left turrets if you ignore the walls in front of them)
Oh, and it’s funny but this is the one boss (I think?) where the pause trick from the original game works, but in reverse. Pausing rapidly while the turrets are firing will cause the bullets to phase right through Mega Man
Actually, if you die against the boss, you get sent back to the spot before the Crash Man lifts and the Tellies. I always grinded against the Tellies by sitting unmoving at the bottom of one of the rooms with the Leaf Shield on and letting the Tellies suicide into my shield. Of course, every time a weapon powerup drops, you have to switch to the Crash Bomber to go pick it up, so you’re also using up Leaf Shield ammo while grinding… At least they recognized the need by not spawning Mega Man at the boss when you die, unlike every other boss in the game.
Here’s how they could have fixed this level:
1) Not making the boss a puzzle boss.
2) Offering a better grinding spot, or alternatively, putting several re-spawning weapon energy pickups throughout the level.
3) Making the boss vulnerable to Mega Man’s normal weapon.
4) If you’re going to make us grind tediously, at least don’t force us to do it in a level that has the worst music in the game.
As it is, it’s easily the worst level in the game, strictly because of the boss. It’s not enough to keep Mega Man 2 from being a great game by any stretch…. but it is JUST frustrating enough that it lets Mega Man 9 rank as the better overall game.
Never hated this boss with the fury of a thousand suns that most players seem to feel. Yeah, it was obnoxiously hard at first — I recall figuring out the route through the room on paper — but once you know you have seven shots for five turrets it should all fall into place. Alternatively, once you learn that the walls stay dead between lives, killing all the walls on one life and grinding C back up to kill the turrets on the next is not a shameful tactic.
At the very least, it is different. I would not have been opposed to similar fights in later installments.
There are a couple of interesting points about this:
Firstly, the mechanic is the opposite of the Bubble boss from MM1. There, the Gutsman blocks stay gone, so that you are pretty much lost if you fail on your first try (or blow away the blocks on the first bubbles). Here, the fact that the walls stay gone means that you can remove them with your first life, restock and try again.
Secondly, it isn’t particularly hard to grind the Crash Bomber back to full strength. As David states above, you can grind in the first Tellies room. Also, the first Tellie (Telly?) will always regenerate on the right side of the room, meaning that if you only kill one at a time, they will slowly drift across the room and are easy to pick off with the mega buster.
I agree that the level is a bit of a chore, but I think it works as an apology or a concession that the Bubble boss from MM1 was poorly designed, and that it isn’t as bad as many seem to think.
I like this boss. If you run out of ammo, you can just die and continue… first time players will almost certainly be doing a lot of that anyway. So the fact that it can drain a first time player’s ammo isn’t really much of a trap. Figuring out what weapon to use and why you need to conserve them is the big sticking point… once a player has figured that out, they only need to continue once to get full ammo, and can then execute. Again, this is no big deal because a first time player has probably been dying and continuing a lot up to this point.
As a young player, this boss always made me feel like something was broken - that there HAD to have been a better way that did not involve continuing and ammo-farming. I guess I was right, but only just barely. My sense is that this boss sticks out in everybody’s minds because, at base, it was hard.
You can also grind for Crash ammo on the Mets right below where you re-spawn, a FAR safer and faster option then taking on Returning Sniper Joes more then needed.
Another important detail here is, I think, the fact that you can only fire 7 Crash Bombers, but you don’t necessarily KNOW that. Unless you’re playing with some of the new features in the Anniversary Edition / Complete Works edition, which does show you ammo count under the traditional bars. Even if you’re the kind of ur-gamer who noted that you’ll need 7 to win the fight, did you bother to check how many shots you have to begin with?
It’s a colossal pain in the ass to get your weapon energy back if you screw up, but at least you have SOMETHING to grind. A certain upcoming boss doesn’t even give you a grind point.
But yeah, the Boobeam Trap requiring an entire stock of the most expensive weapon in the game to kill blows. It’s for the best that later games for the most part ditched having enemies that can be hurt only by one weapon type.