If you enjoy this site (and the other game history projects I run on the side), please consider supporting it on Patreon. Or don’t. Your call. Thanks for reading!
It’s taken us quite a while to get to Metal Man’s stage in the left-to-right, top-to-bottom approach to exploring Mega Man 2‘s stages. In practice, though, Metal Man is almost always my first stop, for several reasons.
First, Metal Man’s stage is surprisingly easy, despite having a dominant mechanical gimmick in the form of conveyor belts. While not without its challenges, it follows its tricky environmental and combat threats with opportunities to restock your health. It features an E-Tank that’s almost too easy to collect. And most of all, the Robot Master at the end of the level is actually quite easy to beat with just Mega Man’s standard weapon yet yields the absolute most versatile weapon in the entirety of the franchise in the Metal Blade. By stopping off at Metal Man’s stage first, you basically grant yourself the easy mode approach to the rest of the game. And that is OK.
Metal Man’s stage consists of gears and clockwork to the point that I’ve always wondered if this wasn’t meant to be the home for Flash Man, a Robot Master whose power centers on time. There’s a bit of a Castlevania vibe going on here, between the clock tower look of the backgrounds to the plunging spike crushers here. It’s not a bad reference to make, honestly; Mega Man and Castlevania were the two breakout stars for original third-party NES creations, so the connection seems apt.
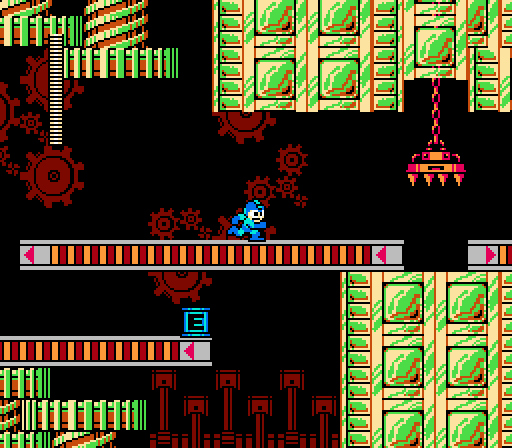
The thick, striped platforms here represent the central trick of Metal Man’s stage: Moving floors. Mega Man’s footing here moves in the direction indicated by the small red arrows, and if simply stand still the conveyors will slide you along either forward or back, depending. If you run in the direction of the arrow, you’ll move at double speed; run opposite its motion and you’ll struggle to make forward progress.
The first belt walk — the flooring you start out on — pushes you forward, immediately prompting you to take action. If you let Mega Man simply stand in his default position, he’ll eventually be whisked right off the forward edge of the platform and into a pit. From there you jump across to the walk seen in the lower-left corner of the screen above, pushing you in the opposite direction. The moving platforms don’t have much impact on your jumps aside from determining your initial velocity, so you can move much more quickly on the conveyors by leaping forward instead of running. To get the E-Tank, you need to make numerous quick hops to scoot forward since the ceiling above the tank is so low.
The process of navigating the moving floors is almost immediately complicated by the spiked plungers that appear in the recesses between the conveyors. They drop once Mega Man draws near them, plummeting quickly from the ceiling to the floor before slowly retracting only to do it all over again a couple of seconds later. These would be fairly easy to avoid under normal circumstances, but the added complexity of the constant motion adds a wrinkle of challenge as you’re forced to nudge Mega Man left or right to hold a steady position as you wait for the plungers to retract. You also need to jump precisely to land on the narrow spaces between them without sliding into the (surprisingly wide) hit boxes of the subsequent traps.
In an example of seemingly backward stage design, you have to deal with a couple of conveyor/plunger combos before you face the plungers surrounded by motionless floor. You’d think it would be the other way around, to ease you into the challenge. It’s not a crucial flaw, but it does seem unusually unfriendly for such an otherwise well-considered game.
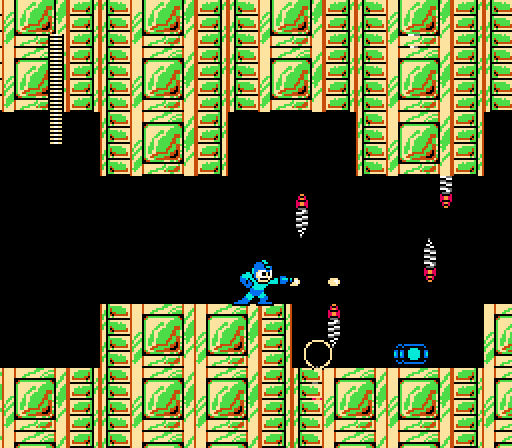
Even if you take a few hits in the plunger gauntlet, you’ll be fine once you cross the gap beyond the moving floor to reach stable ground patrolled by enemies called Moles. Probably the most simplistic opponents in the game, Moles simple burrow in one direction, either up or down, and change speed once the break free from the ceiling or floor. They take several shots to destroy, but they appear in massive quantities and tend to be generous with their drops. By the time you work your way slowly through this area, you should easily have restocked your life and potentially snagged a few 1UPs, too.
The Mole sequence can be fairly tedious, though, so you can also speed your way through by either tossing and dashing after Leaf Shields, whose wide area of impact and piercing effect will wipe out everything in front of you and litter the ground with power-ups; or by using the Time Stopper to completely freeze them in their tracks. Once you clear the area, you can then turn around and mop up Moles for a few minutes to refill the Time Stopper, if you like.
Unlike the plungers, the Mole sequence does reflect more progression in complexity of level design: You begin on steady ground before facing off against the Moles on conveyor belts — initially moving you forward, but then pushing backward. The latter can be tricky, because it’s easy to get so caught up shooting the swarms of Moles that you fail to make forward progress as you slide backward.
Beyond the Moles, a 1UP appears high on a ledge, accessible only with Items. If Metal Man is your first stop, you can’t reach the extra life… though for first-timers, it does serve as a clear indication that there are tools in the game to help you acquire goodies placed in out-of-the-way spots.
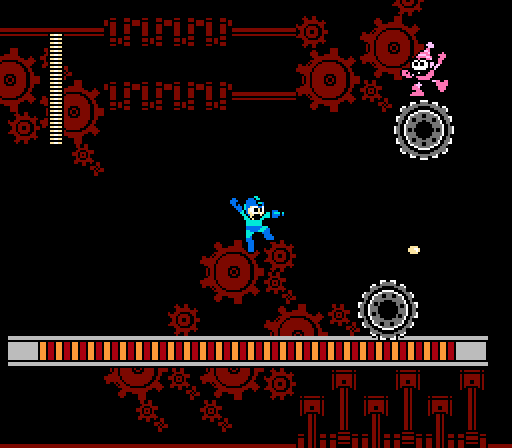
The back half of Metal Man’s stage presents a weird melange of random enemy concepts atop a string of conveyor belts. What do clowns have to do with clockwork, you may wonder. Who knows! But these guys cause the gears they ride to drop to the floor and begin rolling toward Mega Man, working almost as a variant on the first game’s Crazy Razies in the sense that there are essentially two targets here and the uppermost one is the easier one to destroy. A single shot will take out the clown robots, while the gears soak up more damage.
Further along you face enemies who explode toward Mega Man when shot, forcing you to learn to use uneven ground to your advantage. There’s also a second E-Tank, though it’s only worth getting if you’ve already earned one of Dr. Light’s Item devices; the gap next to the E-Tank is too wide to clear by simply jumping, so you either need to create a temporary platform to advance or else sacrifice a life to claim the power-up.
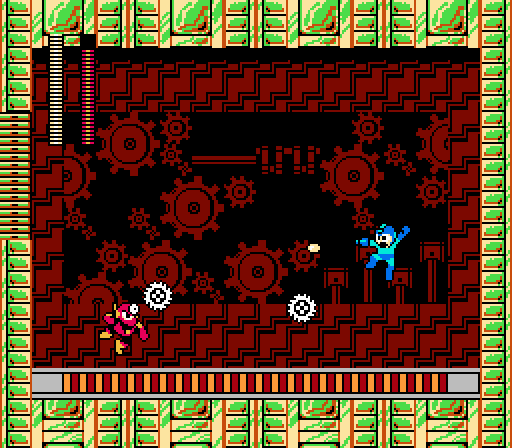
As for Metal Man himself, well… he’s an odd one. At first blush, he seems almost impossible to deal with. The floor in his lair constantly moves and changes directions every few seconds (signified with a quick screen flash), so you’re always on your toes. And the Robot Master himself tends to leap repeatedly and toss a trio of Metal Blades in a tough-to-dodge pattern that homes in on Mega Man’s actual location in space. Between the movement and the flurry of blades, it’s a super tough.
At least, until you learn the trick. Metal Man is a curiously passive boss, one who mostly just responds to Mega Man’s actions. If you stay in place and don’t shoot at him, he’ll do likewise. Every once in a while he seems to get bored and tosses a Metal Blade, but for the most part he only attacks in response to your actions. If you shoot, he’ll pelt you with a trio of blades. If you stop shooting, so will he. If you move close to him, he’ll leap to the other side of the room. If you don’t, he won’t.
So the trick to this fight is to stop and observe, and attack methodically. Metal Man tends to jump when he attacks, so you need to plan for his motion while predicting the timing of his blades. It takes a little getting used to, but once you have the timing in hand he proves to be surprisingly easy to take down. And you, my friend, have just earned yourself a super fancy weapon.
The main reason why I wanted a Mega Man 2 Powered Up was for the chance to play as Metal Man. He just seems like he’d be a neat character to control. Yes, Mega Man can steal his weapon and it’s about the same thing, but I just like Metal Man for some reason.
Well he’s basically a robot ninja who throws circular saw blades instead of shuriken.
I always found the Pierrobots easier to be rid of than Crazy Razy, since you can just shoot the gear and the robot atop it will fall off-screen. If memory serves, targeting Pierrobot itself will leave the gear behind to contend with.
You know, I never really put this together before, but despite the fact that almost all 2D platformers have a “conveyor belt” mechanic, Metal Man’s stage is really the last time in the original NES Mega Man games where it’s a major focus of a level. (It came right back in Flame Mammoth’s stage in Mega Man X, but still.) I mean, platforms that push you forward still *exist* in the later games (look at Dr. Wily’s castle in Mega Man 5, for instance,) but they’re always so tiny that the danger doesn’t really come from them making your movement harder to control, but rather the fact that if you stand on them for more than a moment, you’ll fall off. They’re functionally more like Bubble Man’s falling platforms than Metal Man’s conveyor belts.
So why did the developers stop liking conveyor belts? I think it’s probably because they’d affect you much less in Mega Man 3 and later games, where you could make headway against them by sliding. If that is the reason, then that’s a pretty thoughtful and subtle design choice, in contrast to most of the rather half-baked ideas that got added to the series in the later games. (Super Arrow and Mega Man 6’s use of Rush were still awesome, though.)
And the later games actually introduce plenty of variations on the basic conveyor belt that you can’t beat just by sliding. Ring Man’s stage has an interesting sort of inversion of the concept, with platforms that gradually phase out of existence from one side to the other, so you have to move under your own power to keep up with them. And Spark Man’s stage has platforms that move vertically as soon as you touch them. They’re still trying to push you into an instant-death trap, but they’re much trickier to deal with because you can’t stay in place just by running the other way, and sometimes you have to wait for them to rise to a certain height to be able to make your jumps.
Because of the reasons outlined here, Metal Man is almost always my first choice when playing Mega Man 2. When I was very young, I remember having heated arguments with my older brother over which boss should be defeated first: Metal Man or Air Man.
Air Man, simply because you lose out on that second E-tank* and the 1UP from Metal Man if you skip him, while his stage doesn’t really play to the Metal Blade’s strengths.
* - Unless you’re willing to sacrifice the life, which then potentially brings us to a discussion of the game’s continue mechanics….
But if you do take on Metal Man before Air Man, you can potentially have one or two (I know, life sacrifice) E-tanks to scarf down like Popeye, which can come in handy for surviving that air-blowing bastard’s waves of invincible tornados paired with blowback mechanics. Also the Metal Blade’s one of the many weaknesses of Wood Man, so you could go kill him and be rocking Air Man’s weakness for the fight against him.
Also I’m pretty sure the Metal Blade’s one of the weapons that can one-shot those robot chicks that hatch from the robot bird’s eggs, so with proper timing it can make for easy item grinding.
Metal Man’s stage has plenty of gimmicks (the conveyor belts, the crushers, the drills bursting through the floor and ground), but with a little practice I’d argue the stage rivals Wood Man’s in ease of difficulty. Even moreso with the boss; Wood Man hits like a house of bricks while Metal Man’s almost entirely reactionary. You even get two opportunities for E-tanks in Metal Man’s stage, even though one might cost you a life.
Actually it is possible to leap that pit after obtaining the second E-Tank: If you pause and then un-pause while jumping, Mega Man will hover mid-air for a moment, resetting his falling inertia. Leverage that mechanic with repeated pauses/un-pauses to jump that pit.
You probably use the pause trick to beat Yellow Devil, too, don’t you!?
There’s a mad scientist on the loose, so to save the day, I will use whatever tools are at my disposal! And Jason from Blaster Master agrees with me about the effectiveness and utility of Pause.
Somewhere out there Simon Belmont sulks in a corner that this trick does not work for him.