Regardless of which route you selected to take through the core of Castlevania III, all roads eventually converge at the beginning of Block 8: Castlevania itself. And the scenery should look very familiar indeed.
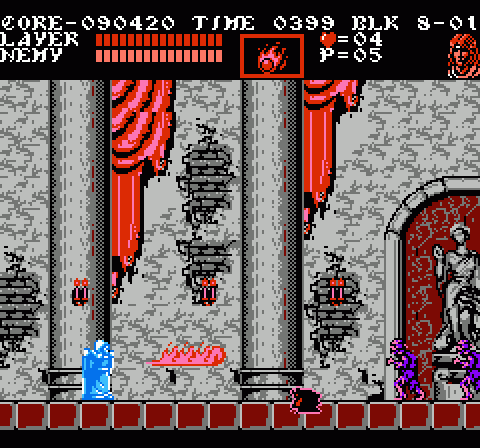
Yes, it’s Stage 1 of the original game, reproduced in wonderfully faithful form — all the way down to the music and enemies, in fact. It’s not just a simple copy-and-paste reuse of resources, though. As befits a trip through the castle entrance in a prequel set hundreds of years before Simon’s journey, the area feels less worn now. The broken, headless statues from the first game now stand whole, secure in alcoves lining the room. The raised platforms that used to play host to a reclining attack panther for no good reason have a purpose now: They’re the landing of a stairway that leads to the upper levels. Rather than march forward through the Fish Men’s basement and beyond, you ascend much more quickly to Dracula’s lair.
Fittingly, Block 8 feels like a combination of the first and fifth levels Castlevania. The marble entry chamber connects to a grim dungeon through a linking corridor beneath which rows of spikes skewer human skulls.
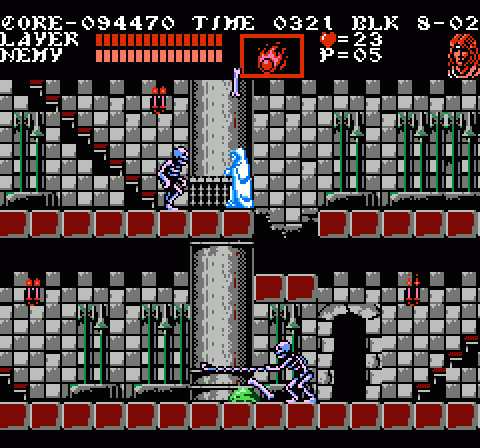
The familiar zombies and bats of Block 8-01 begin to recede in favor of new foes as you enter Block 8-02: The spiders that showed up frequently throughout Alucard’s route, and the Axe Knights that dominated the dungeons of Castlevania. Skeletons of all stripes appear. And while the color scheme remains a warm brown and grey compared to these equivalent stages in the first game, make no mistake: This is very much the same essential territory, a cross between a dungeon and an armory.
Fittingly, it doesn’t really matter which companion you’re traveling with at this point. This is classic Castlevania fare, and as such the warrior best suited to the task is Trevor. (Yes, the screens here — provided by VG Museum — contradict this claim, but trust me on this one.) There are no fussy platforming sequences, alternate routes, no need for fancy magic spells. As you enter the final stretch, Dracula’s Curse pauses for a moment to take you back to the basics. If you’ve taken Alucard’s route to get here, this will undoubtedly come as a tremendous relief in the wake of the inhumanity of Block 7. Either way, though, this stage serves as a sort of sorbet between the perils that have come before and the gauntlet of the final obstacles.
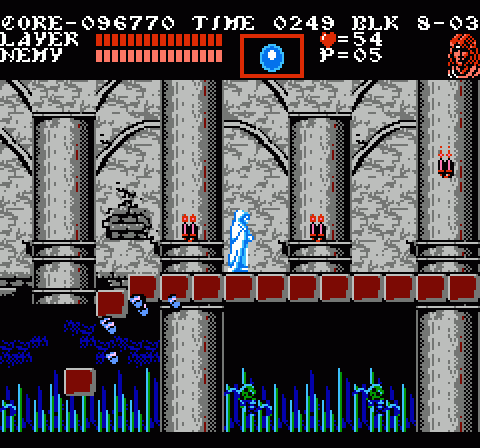
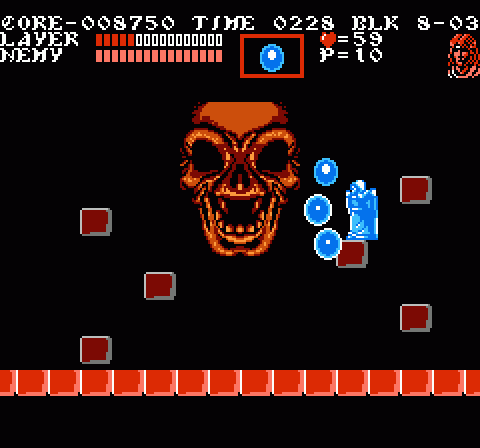
It’s only when you reach Block 8-03 that the level starts playing for keeps — and even then, it’s not entirely unkind. It actually hands you a Boomerang and a double weapon multiplier right at the outset: Essential tools for the boss ahead. Of course, it can be a bit tricky to hang onto these items all the way to the boss, but the effort pays off.
The last portion of Block 8 sends you over a bridge that begins collapsing behind you once you venture onto it. You’ve dealt with this mechanic before if you came over through Sypha’s route, but fittingly this permutation proves to be far more dangerous than the one featured in Block 6-0D. There, you could simply fall in with the game’s natural rhythms (dashing forward as quickly as possible and jumping to take out the Fish Men in midair) and never have to worry about succumbing to the bridge’s collapse. Not so here: Patrolling the middle of the bridge is an Armored Knight, who meanders slowly, has too tall a hitbox to leap safely, and requires multiple hits to clear out of the way. You’ll have to pause in your panicked advance in order to destroy this obstacle, which allows ample time for the tumbling bridge (which falls very slightly faster than you walk) to catch up with you.
Of course, you can work around this with a companion: Grant can clear the knight with a jump, Sypha can blast it with one shot of the flame spell, and Alucard can do his usual and just fly over it. Still, coming up with this strategy on the fly can be tough when you have a nerve-wracking chasm of instant death creeping up on your heels. It’s a fair but demanding wrinkle on a familiar hazard and makes great use of the hero-change mechanic.
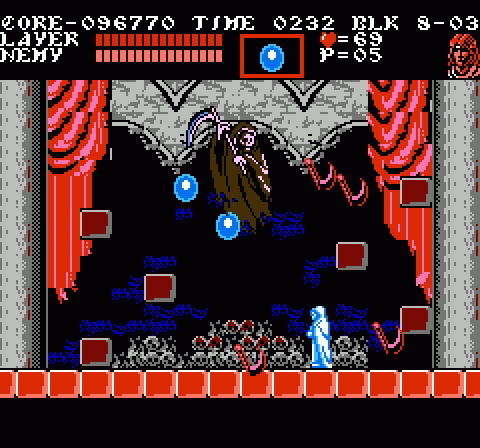
At the end of it all awaits — not surprisingly, given the nature of the middle portion of the block — none other than Death. He’s in much better form than in Simon’s Quest, behaving much more like his old self rather than the toothless wraith of the second game. He bobs and weaves about the room, not behaving aggressively, exactly, but perfectly happy to crowd your protagonist for some hardcore collision damage. Meanwhile, his scythes spin through the air — four at a time now rather than the trios from before! — orienting themselves on your position at the moment they materialize and making a beeline for that point.
Despite these factors, this encounter with Death feels less overwhelming than in Castlevania. In large part, I think this is because he and his scythes move more slowly than before, giving you a little more time to react. Also of note is the fact that the raised central platform of Castlevania’s Death battle has been abolished, with a handful of suspended blocks lining the chamber but a lower central floor. This makes more of a difference than you might think, because it gives you a full character’s height of extra space with which to dodge the Grim Reaper. It also means there’s more space for Death to move through, meaning he’s less likely to want to occupy the same space you’re in. With more time to react and more room in which to do it, this fight can be tough… but it’s nowhere near the insane beatdown the first game delivered.
That being said, as of Block 8 enemy damage values hit their max for the game, leaving you very little room for error as every character goes down for the count in four hits.
Oh, but you didn’t think it would be that easy, did you? Have you learned nothing about this game?
After reprising the single most difficult fight in Castlevania, Dracula’s Curse then turns around by immediately introducing a second form for Death. I can’t imagine that anyone in the world took down the Grim Reaper in the first game and though, “If only this battle had another phase!” And yet here we are.
The good news is that Death II is almost laughably easy. He drifts across the screen from right to left, describing a series of clockwise loops as he moves. This is about all he does, though. Once per loop, he’ll spit a scythe at you — but only one, and with plenty of telegraphing. There’s really no excuse to take any sort of damage here; if you managed to hang onto the Boomerang and multiplier, this fight is a joke.
Savor that sensation, though. The road ahead can be quite demoralizing.
I’ve been enjoying this Anatomy of a Game Series perhaps more than any other. I will be really interested on the post when it comes to finally getting to Dracula. I watched the Game Center CX on the recommendation of another poster here and was amazed at the problems Arino had at the game. It appears that Dracula would be nearly impossible.
I only remember renting this game once as a kid, and do not have many memories of the Castlevania series. They were always too difficult for me. The intricacies in its that you have pointed out to me have been really fascinating.
It is absolutely insane to me how much attention to detail Konami put into making sure everything ‘fits’ together. I know it’s something you’ve brought up a bunch when writing about the original game, but to see that spirit carry over here to such a degree is chill inducing.
One of these days when I have free time (ha!), I’ll have to whip through these games on game genie so I can do side by side comparisons. I’d really like to see first hand what difference the block layout during the Death fight makes.
Excuse me Mr. Parish, but playing with Sypha is just cooler!
Erratum: there were no (headless) statues in the first level of Castlevania 1
I agree! Sypha is the best. Just sayin’. I appreciate the fact that you managed to screen cap just about every single thing I’ve wanted to talk about. I definitely owe you a copy of this book once it’s ready.
Adrian (F. Tepes?): You don’t need to play the games, you can see how much the games “fit” together right here:
http://www.vgmuseum.com/mrp/NewCV/cograph.htm
I really like that Castlevania III has a password system, because while I may not get particularly good at the game, at least seeing all these wonderful and sadistic levels firsthand is as easy as popping in the right password.
Death was always a jerk in the original Castlevania if you didn’t have triple holy water by that point, but between the more open arena and the slower speed, along with partners and not having to deal with a hallway of axe knights and Medusa Heads, I’d expect CV3’s fight with him to be easier overall, even with the flying skull form.
Parish: you only need to thank yourself, I took full game screenies because I knew you were going to need them back then when you did thumbs up/down reviews for VC releases years ago. After you stopped, I pretty much stopped too.
*Cue loud “awwwww”.
No kiddin’? Shux.
Best level in the game right here. It’s awesome hearing how everything ties together!
Nitpicking time: Anyone can vault that armored knight in the final corridor. And the cross is useless against Death’s second form. Of course, it’s still one of the best options against the much more difficult first phase.
Are you sure about the boomerang? I could have sworn I’ve used it in this fight.
And the knight’s not so bad. They pull the same trick in the next block but in a much worse way.