The path to Zelda II‘s fourth dungeon incorporates my absolute least favorite area of the game: The eastern labyrinth. The labyrinth contains a number of key points of interest, including the Labyrinth Palace and a fetch quest item, a small lost child. I don’t know why Link has to rescue the kid; any child capable of making his way through the deadly fields and caverns between Darunia and the labyrinth without being slaughtered by the various murderbeasts along the way is probably some sort of chosen prodigy. Nevertheless, Link has to go out and find the kid, tucking it into his satchel like any other quest item before returning him to the corresponding quest-giver. In return, he receives the Reflect spell, without which the next palace cannot be completed.
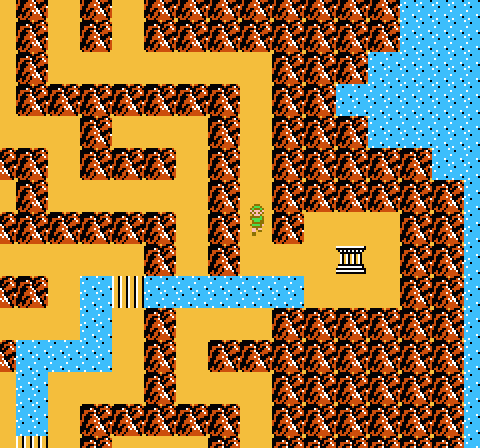
The labyrinth itself isn’t tremendously daunting. It’s separated from the Hyrule mainland by a lengthy bridge that, miraculously, doesn’t send Link into an extended combat sequence against infinitely spawning monsters and bubbles to chip away at his EXP tally. The labyrinth itself consists of neutral tiles, so you don’t have to deal with random monster attacks as you explore. Rather, walking over certain tiles of the labyrinth sends you into fixed combat spaces, including a pitfall that leads to a cave where the lost child awaits.
Also hidden in the labyrinth is a Magic Container to boost your magic total. This has been tucked away in a path of the labyrinth you never need to walk over and is incredibly easy to miss. I did, back in the day. I then discovered that you can’t enter the Great Palace unless you have maximum health and magic, even if you’ve conquered the first six Palaces. In the days before the Internet, that meant I wandered the entirety of Hyrule for the better part of a month, trying to find a cave or secret that I’d somehow missed before finally stumbling into an unmarked spot in the labyrinth that contained the crucial, untelegraphed item I needed to complete the game.
For all of Zelda II‘s clever ideas and creative successes, it was still very much a product of its time, and this means it sometimes falls into unfriendly patterns of design. It doles out hints far more readily than other console games of its vintage, nudging the player toward success and rarely leaving you to wonder how to proceed — or at the very least, giving you the pieces to sort it out on your own. However, many of its solutions rely on forcing the player to cover every square inch of the overworld in search of hidden spaces, often while under constant assault by irritating monsters. These few areas — the labyrinth Magic Container, the ocean Heart Container, Bagu, etc. — at times reduce the game to a matter of dumb luck and persistence and become unwelcome choke points to progress.

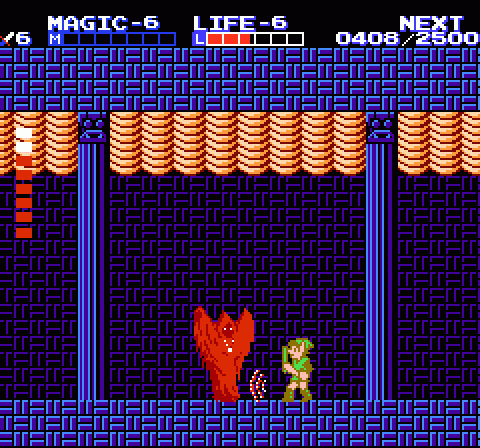
Thankfully, once inside the Labyrinth Palace, things are nowhere near so frustrating. True, the Palace can be tough, and it does have a few excessively cheap elements. By far, my least favorite are the Medusa-like horse heads that swoop down on their parabolic assault vectors. Even with Link powered up to the point he should be at by this point in the game, they require multiple hits to take down and will drain considerable EXP from Link upon contact.
That’s not why they’re so frustrating this time around, though; rather, their exasperating quality in the Labyrinth Palace comes from the way they appear in dangerous situations — usually over collapsing bridges above pits of lava. They swoop down quickly at an angle that’s difficult to defend against, always appearing in just the right way to knock Link back into lava. Yet there’s no easy way to stop and fight them off here (because eventually they do stop spawning), as the bridges over the lava vanish once you step on them. You need to keep pressing forward, leaving yourself incredibly vulnerable to the horse heads; a handful of slip-ups and you’re back to the game’s starting point to fight back to the Palace all over again.
Outside of these nuisances, however, the Labyrinth Palace mercifully plays nice. The enemies in this area are almost entirely creatures you’ve faced elsewhere, and while they’re powerful you have plenty of techniques and spells to deal with them. They also yield far better EXP rewards than the beasts of the overworld, so it’s not too impossibly difficult to farm experience near the entrance to the labyrinth and build up some levels if you find yourself deficient.
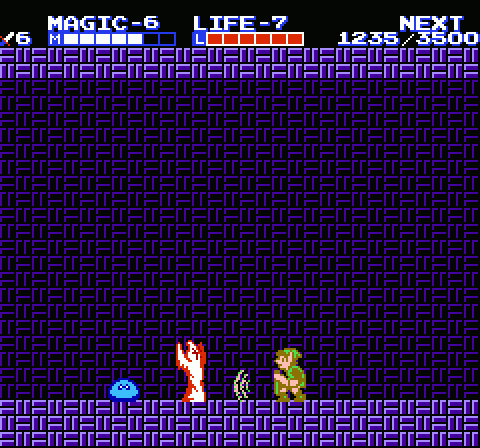
The one new foe of note this time around is the Wizzrobe, who behaves much as in the original Zelda. They materialize into the room, fire a beam of magic at the lower shield position, and vanish again after a second or two. Link’s shield can, by default, absorb these spells (provided he ducks), so the Wizzrobes aren’t too difficult to defend against. However, none of Link’s offensive options can hurt them; both his sword and his Fire spell pass right through them, harmlessly. Instead, you need to use the Reflect spell to bounce their magic back at them for an instant kill.
The Palace’s boss turns out to be a large Wizzrobe named Carrock who must be defeated in the same manner. The boss teleports around the room at a much faster pace, often appearing before Link can even respond and frequently hitting you in a fairly cheap manner. However, with the Sheld spell up, Link can soak up dozens of attacks by the boss. You can’t hurt him and he can’t hurt you much, so the question becomes a matter of how you can triumph before your health whittles its way down to zero.
Obviously, the answer is the Reflect spell. And while it’s possible to enter the Palace without the spell, you receive both hints as to its importance from villagers and face off against smaller versions of the boss several times through the Palace. There should be no real mystery about the secret of success here, and while the boss can be dizzying with the rate at which it warps around the room, victory is as easy as standing in one spot and facing back and forth to let the boss warp into his own reflected magic. The in-level boss tutorial represented by the Wizzrobes is one of Zelda II‘s better learning-through-experience instances, and suggests that the developers didn’t totally lose the plot in the second half of the game after all.
“I then discovered that you can’t enter the Great Palace unless you have maximum health and magic, even if you’ve conquered the first six Palaces.”
Oh, wow, I had no idea! I was OCD (and probably had a Nintendo Power guide with me) so I never even tried to finish the game at less than max stats. That would have REALLY pissed me off!
Thank God Nintendo didn’t keep that kind of requirement once they started with this piece of hearts nonsense. I haven’t 100%ed a Zelda since LttP.
I had no idea about needing all the health & magic upgrades at the end, either.
Let me join in the chorus of commenters wondering how in the hell any of us beat this game when we were kids.
I, too, was unaware of the requirement- you obviously need all of the magic containers to beat the game, yes, but to even enter it?
Given that you just described how you can go into the palace without the needed Reflect spell, such a prohibition is almost charitable on the part of Nintendo.
And sorry to nitpick, but I thought the island was called “Maze Island,” and that the child had been kidnapped by the monsters there.
Was never able to beat the first Palace. Those horse-knight-thingies are way too cheap.
“Meikyuu sweat” caused me to actually Laugh Out Loud, and not in an internet way.
Here’s something to think about. In the Japanese version, key items were originally collected the same way as regular bottles and experience bags: by stabbing them. Considering one of those key items is a child, it’s pretty understandable why that was changed during localization.
This palace frustrated me when I replayed it for these articles and for a very specific reason - it requires you to jump down a bottomless pit to get the water boots. This always felt like a mean leap of logic to me as a kid and I always forgot to do it.
But this time around I actually paid attention and noticed something - there ARE no bottomless pits in Zelda II that kill you. If a pit is going to kill you, it always has lava or water at the bottom of it in plain sight. It doesn’t matter if it’s in a cave or in a palace, if you see a pit with no bottom, that’s the game’s way of telling you to jump into it. After playing tons of NES games where bottomless pits always kill you, I can see why it took so long for my brain to accept it.
Also, someone tell you to jump.
That’s one thing I love about Zelda II: It really has you look for the little things, the little differences in your surroundings to clue you in.
Thanks for continuing to spell out all the reasons I will probably never play through this game!
When I played Zelda II years ago, I too got stuck here. I spent many months trying to find the kid. I explored the Palace, including facing off against Wizzrobes that I couldn’t beat due to not having the Reflect spell. I talked with NPCs and new I was not finding the kid — but also that I wasn’t finding something in the Palace either… I did ‘jump’ in the pit, but found nothing there. Finally I decided to start a new game. And I couldn’t find any of the key items that would allow me to progress.
Yup, my cartridge had glitched. Whenever I would reach a key item, it would be ‘missing’ from the screen and not be obtainable.
A year later, I deleted all save files, and started a new save file — and the glitch had fixed itself. I was able to complete the game, including finding the kid in the maze and jumping down the pit in the Palace. Loved the game even after all that pain!
I used to think Carrock was the wizard who put Zelda to sleep and thus the main boss, so I felt that the remainder of the game was a second quest of sorts.
Whoa, he kind of does look like the dude in manual. Weird.