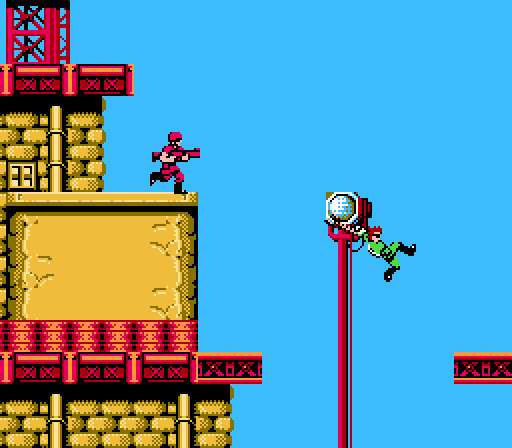
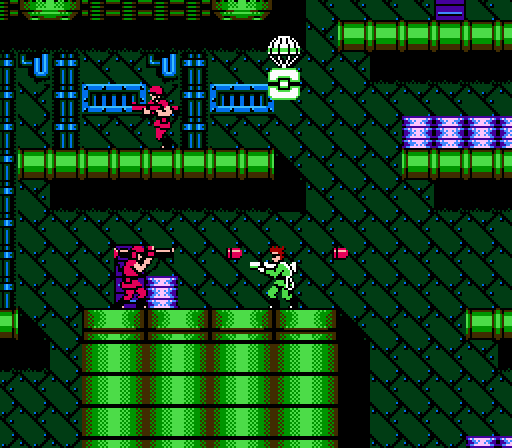
Having reached the communications array for Area 1, you’ve opened the door to the base interior. In order to get there, though, you need to make your first true and proper swing; the outer base is divided by a large gap that can only be crossed by swinging across with this lamp as your grappling point. The game does a good job of communicating what you need to do here; the space between the two installations consists of nothing but pure blue sky punctuated by a single search lamp post topped with a lamp whose design incorporates a visual dimensionality that breaks the visual plane and appears tangible. It doesn’t take much to get the point: This is how you’re traversing the opening.
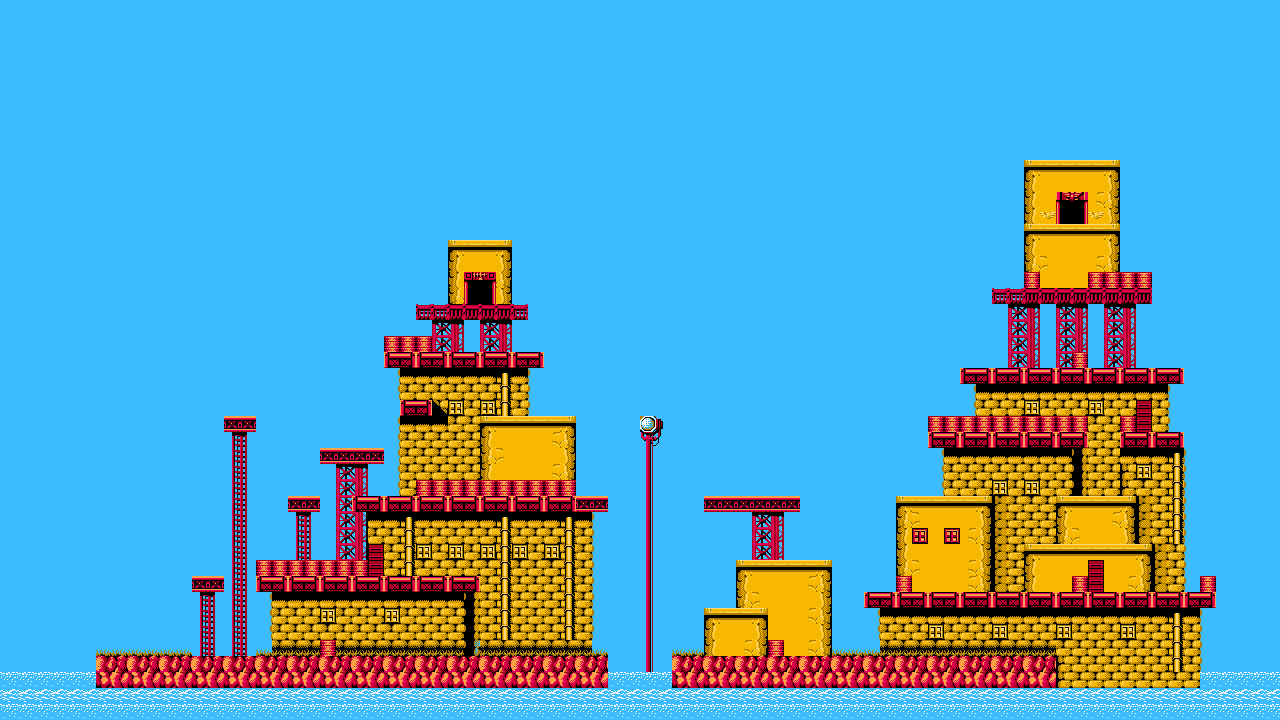
The second outer fortress has much the same design as the first: You need to climb it, but you can’t simply zip from one level to the next. You need to work your way back and forth, avoiding obstacles and enemies.
Speaking of enemies, you face two kinds of soldiers here: Standard roaming soldiers, and stationary gunners who protect themselves with cover. The foot soldiers are practically a non-factor; they wander about aimlessly and will occasionally drop down from one level to the next, but they stand and twitch momentarily before committing to a jump, as if they’re nervous about taking the leap. Every once in a while, they’ll fire a random bullet or two as well. But if you let them stand around long enough to take a shot at you, you’re doing it wrong. The enemy infantry will become more aggressive in later stages, but here they appear to have been deliberately toned down to keep things manageable for you.
The cover-shooters are a little trickier, as they pop up just long enough to fire three shots at you in rapid succession and immediately drop back down. You need to fire at them right as they stand and then immediately duck below their fire. Where the foot soldiers simply introduce you to the idea that there can be bad guys wandering around, the gunners introduce you to a more sincere threat. You can’t get past them unless you master the idea of timing your shots to hit a target before it moves, as well as the need to duck out of enemy attacks.
When defeated, the enemy soldiers here drop only a single type of collectible pick-up: Green-tipped bullets. You can collect them by walking over them or by grasping them with the bionic arm to pull them close, but either way they have no immediate effect. It’s not until you reach the second half of the stage that you’ll be able to collect enough to enjoy the benefits of gathering these drops: Once you pick up your fifth bullet, you’ll hear a chime and a small icon will appear at the top of the screen.
Again, the value of this turn of events may not be immediately apparent, but the icon represents a point of health. When Bionic Commando begins, it works just like the arcade game: One hit and you’re dead. But this being a console game, it’s meant to be something you can master rather than a quarter-gobbler. Knowing the play mechanics are tricky enough on their own, Capcom redesigned the NES game to include the ability to fill out Captain Spencer’s life bar. Bullets works as experience points, and the more you collect the longer your life meter will become. Any attack you suffer in the beginning of the game will instantly destroy you, but once you’ve gained a life point, you can soak up an enemy attack. The more life points you add — and the cost to upgrade increases with each level, though not quite exponentially — the more durable you become.
Another tactic you can learn for effective play here is precision grappling. Several of the gunners sit on platforms with a bit of space behind them. You can snag onto the ceiling beneath the unoccupied space, pull yourself up, and shoot these otherwise dangerous foes unguarded. It’s a handy tactic to learn, and one that will become essential throughout the game.
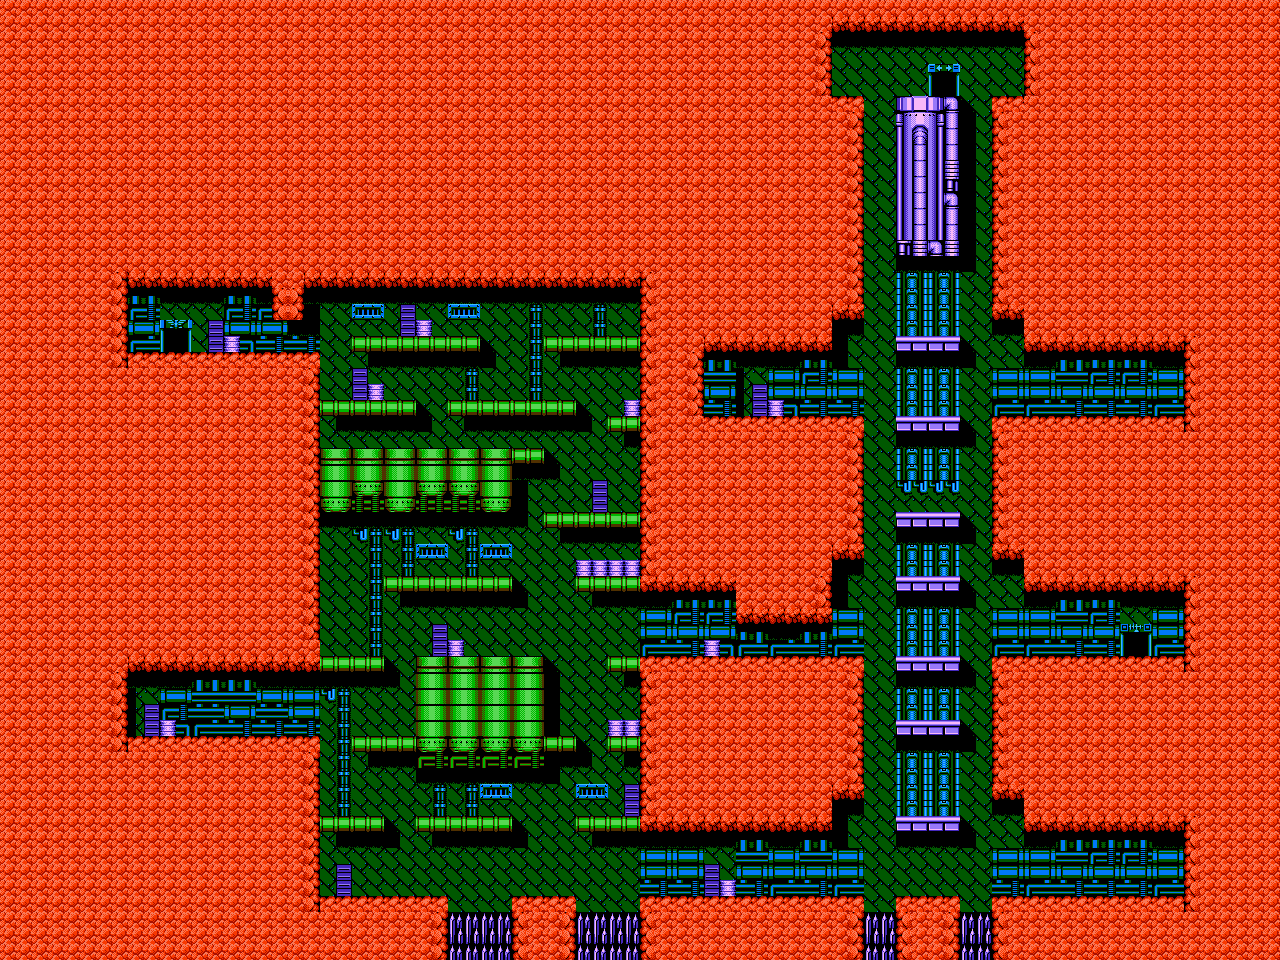
Area 1 turns out to be surprisingly large for an introductory area to a game built around a never-before-seen mechanic. The base interior actually occupies more total screen real estate than the outside, and its structure is considerably more intricate. (Better not to question why the interior of a narrow tower appears to be constructed within endless bedrock; Badd technology is spectacular.)
The entry area flanks you with two elevators that will carry you down a tall shaft, deeper into the earth. Remember that hacked dialogue that said to beware the elevator? Well, here’s the elevator. It turns out the one to the left is rigged to send you plummeting into a pit of spikes as soon as you step on it — though a quick-witted player can save their own bacon by snagging a wall as they drop. While this booby trap isn’t entirely fair, the game does set you closer to the safe elevator on the right, which can be controlled by pressing the up and down arrows. You’re more likely to step on the elevator immediately adjacent to the interior entrance, especially since it triggers your “move left to right” platforming instincts. If, however, you can’t figure out what you’re supposed to do here, the rigged left elevator will drop from beneath you and clue you into the fact that you need to descend.
An alcove midway down the right elevator takes you to another communication room, where you unlock the door to the boss chamber. You could theoretically reach the boss before using the comm station, but it’s unlikely, since the stage design is fairly convoluted and the alcove is right next to the entry shaft.
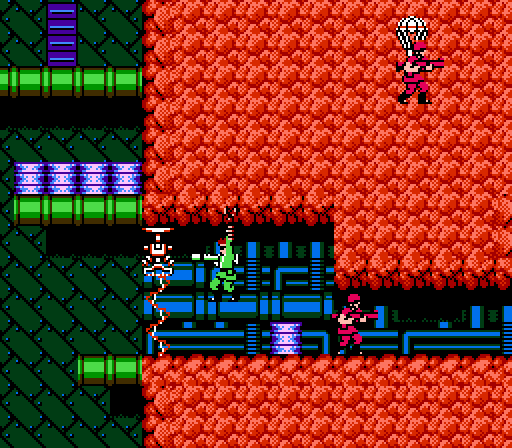
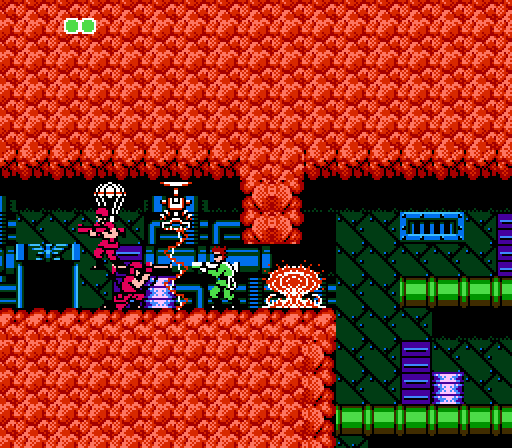
You’ll find a considerably elevated threat level inside the base. Foot soldiers endlessly parachute into base (through the bedrock, even); the cover-using soldiers now can alternate between rocket launchers and bombs, forcing you to stay on your toes. Several electrical barriers obstruct the paths through the base, forcing you to use your grappling arm to pull yourself up toward the ceiling and shoot the shield generators out before you can advance.
There are a few niceties to be found here. You’ll see a couple of green-and-white boxes parachute into the base. By this point you should associate that particular color scheme with good things thanks to the bullets you’ve been gathering and the white-and-green health point icons they help generate. In this case, the boxes contain a variety of power-ups — usually a POW symbol that causes an indestructible ball to orbit around Captain Spencer for about 10 seconds, taking out any enemy it hits and blocking deadly projectiles.
Speaking of bullets, the endlessly parachuting soldier drop them (unlike infinite troops supplies in most other areas of the game), so you can continue to farm health boosts. When you reach a new character level, your health is completely refilled to its new maximum, so gathering power-ups basically amounts to free healing. There’s definitely a point of diminishing returns with leveling up, as after about three or four health icons appear the cost of reaching the next boost becomes tediously high, but the thick swarms of foes actually work in your favor here due to the low danger they pose and the ample rewards they offer up in defeat.
The boss door waits at the upper left of the base interior. Your route takes you down, then left, then up, then left. If you haven’t gotten a feel for Bionic Commando‘s move away from linear or one-directional scrolling, this should clear things up nicely.
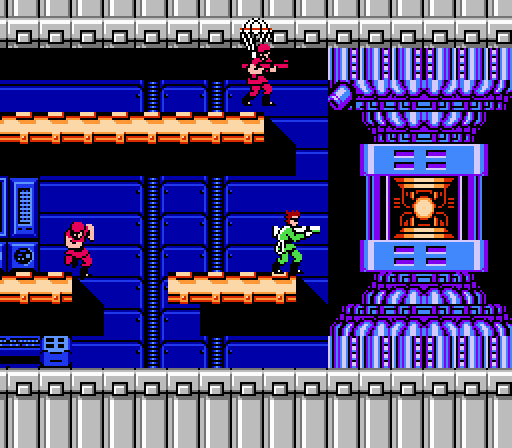
The boss door poses the most difficult scenario in the entire stage, with a shield generator, a rocket soldier ducking behind cover, and the usual throng of parachuting soldiers. You need to take out the shield while avoiding the other hazards, which can be tricky; the guy with the bazooka will blast your feet while you dangle to take out the shield, so you have to alternate grappling to the ceiling with ducking. Unless he decides to chuck a bomb at you, which rolls past you and doesn’t inflict damage until it explodes — that offers a perfect break in his attack pattern for you to focus on the shield generator.
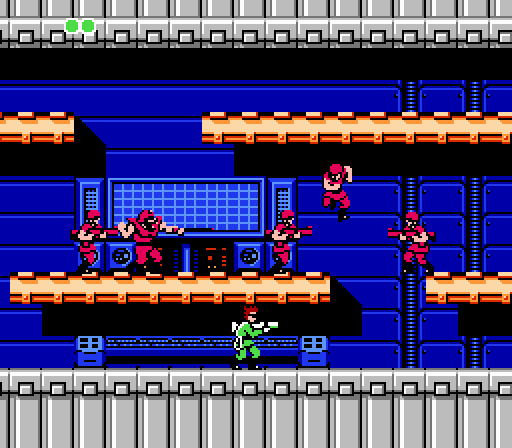
Inside the door, the base commander — a burly, bearded guy — threatens you and begins summoning an endless array of infantry. Unlike the paratroopers in the previous area, these guys move quickly, fire fairly aggressively, and don’t drop bullets upon their defeat. It doesn’t take long to realize there’s no percentage in dealing with them; better to complete the objective as quickly as possible.
The commander, by the way, is completely harmless. He simply stands in place and waves his baton. However, he does have a special death animation: He slumps forward before vanishing.
The objective here seems pretty clear: You need to destroy the base’s central reactor. In case you weren’t clear on this fact, the commander even taunts you for your intention to “destroy the main system.” There’s a nice big target to shoot at here, and no Mother Brain-like complexity to get in your way. Just stand and blast the thing until it explodes, dodging the occasional scrub-class foe. You don’t even need to make special use of your bionic arm or anything — the vulnerable point of the reactor is at gun level.

Destroy the reactor and you’re treated to a mission report screen in which Captain Spencer reports back to his team to inform them of the bonus item collected for completing Area 1: Energy Recover Pills, which slot into your equipment grid and can be used to instantly restore your health in the heat of battle.
The first stage is down, and with its completion the player should have a solid grasp on Bionic Commando‘s fundamentals. The game gets trickier and more complex, but by and large it simply iterates on the challenges you’ve faced here.
I LOVE this game. I play it all the time. Only thing missing? A save feature.
I remember grinding for bullets at the door in the outdoor part of the level, near the base of the second tower. Glad BC Rearmed just did away with that whole mechanic.
Decided to check GameFAQs, and sure enough, someone apparently tracked the bullet-hit point marks:
5 bullets: 1 life point
15 bullets: 2 life points
30 bullets: 3 life points
60 bullets: 4 life points
100 bullets: 5 life points
150 bullets: 6 life points
220 bullets: 7 life points
300 bullets: 8 life points
Eight is apparently the maximum, though it doesn’t say whether the counter resets to zero after each milestone. So I don’t know whether after getting five for your first if you have to get ten more for two, or 15 more.
Speaking of Rearmed, I don’t think they played the generator thing too much there, did they? That kind of disappointed me, as I recall, though I did enjoy the new bosses.
It doesn’t zero, if I recall correctly.
I just had to double check to make sure, but on the pause screen (accessed by hitting select, oddly) in the lower right, there’s an “L=” stat that tells you exactly how many bullets for your next health point. It starts at 0/5, and once you get 5, changes to 5/15, and so on. The counter therefore doesn’t reset, and it’s always easy to check how close (or far!) you are from your next health point. I think a whole lot of people missed that.
Yep, I hadn’t really gotten into the pause screen and equipment system, but it does track your experience (“experience”) level visibly.
Sorry, I didn’t mean to jump the gun! On the upside, I started the game just to make sure I was remembering correctly, and it’s currently paused in Area 9.
Great series so far! If I had to ding one design flaw in this game it would be the need to grind bullets in this first interior area. I have never tried playing the game through where I didn’t at least get 3 health points before moving on. It seems like a simple solution would have been to give the play a couple hit points as the default. Oh well, a small price to pay for the fun ahead.