The Anatomy of Mega Man | 8 | Heat wave

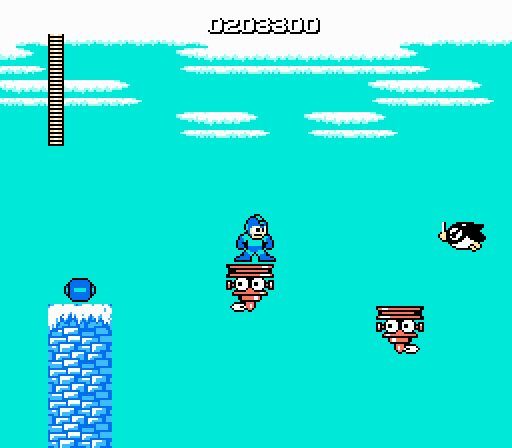
The traditional vision of Hell involves flames and burning. But Mega Man goes with the Dante version, in which the deepest pits of Hell appear as frozen wastes, an icy tomb for Satan himself. Compared to Ice Man’s brutal level, Fire Man’s seems comparatively pleasant. Despite being set in a blazing furnace crammed with open pits of molten matter and impassable geysers of flame, the design of this stage embraces newcomers and pros alike with smart design and relatively few unreasonable challenges.

140502-megaman42

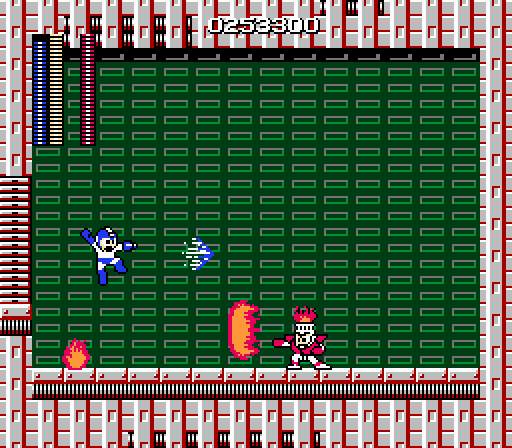
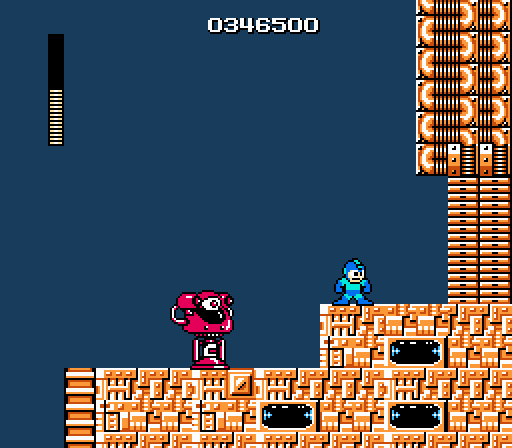
Fire Man himself, however, doesn’t really make an ideal starting point for a fresh playthrough of the game. He doesn’t hit nearly as hard as Elec Man or Ice Man, which befits the not-necessarily-for-experts design of his level, but he can be maddeningly difficult to best. Fire Man plays it aggro, getting right up in your face and pelting you with his weapon, the Fire Storm.

As is often the case in this game, the Robot Master’s version of his weapon differs considerably from the way it works for Mega Man. The player’s version of the Fire Storm blasts small fireballs while a second ball rapidly circles Mega Man to function as a sort of shield; for Fire Man, though, it takes the form of a wide wave about the height of Mega Man which flies straight ahead at a rapid clip. Meanwhile, a flame ignites on the ground beneath Mega Man and burns momentarily. To evade Fire Man, you need to stay on the move to avoid being caught by the pilot light while making high jumps over his horizontal attacks and dodging his tackles.

This is more easily said than done, and despite not being as strong an attacker as some of his peers, Fire Man can make short work of you. After all, you have to take shots at him between all that evasion, and even his weakness – the Ice Slasher – doesn’t do nearly as much damage as some super-effective weapons do to their opposite numbers. That pilot light in particular is especially hard to avoid, since it bursts up beneath Mega Man every time Fire Man’s direct attack crosses his path.

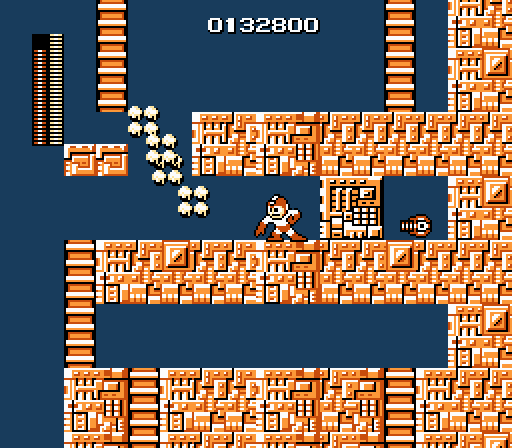
So, yes, Ice Slasher is your key weapon here, and it does a great job throughout the stage. On the starting screen, you can use it to freeze these pop-up turrets while they’re exposed and plink them with P bullets as they’re immobilized.

It’s also incredibly valuable against these flame pillars, which rise and fall at regular intervals. Nothing can damage or destroy the columns of fire, but the Ice Slasher can freeze them and immobilize them.

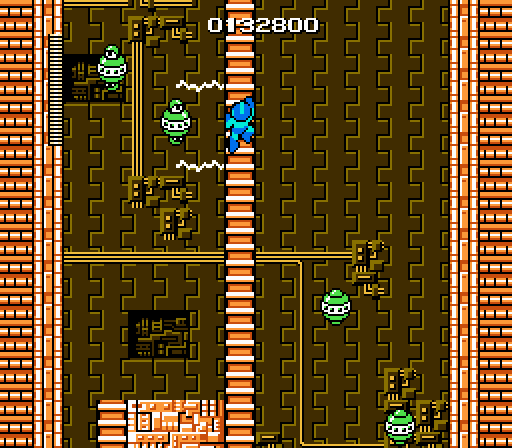
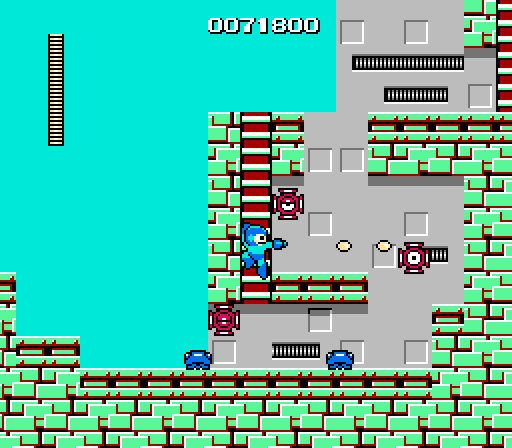
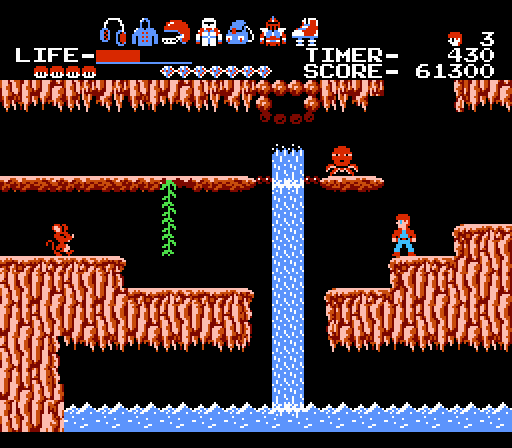
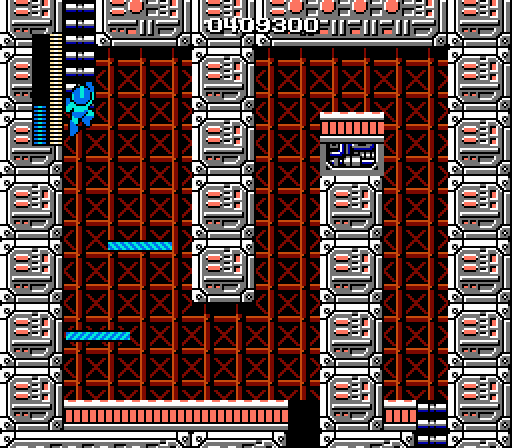
“Waves” seems to be the theme of this entire stage. Not only are you avoiding waves of fire, but the stage design itself follows a wave-like design, constantly undulating. You’re moving up and down, left and right, constantly doubling back and forth on many of the stage’s screens. It betrays the vintage of Mega Man – a game released in the early days of the platformer genre being a thing that involved scrolling. In single-screen platformers, every inch of real estate is precious; think back to Donkey Kong and Mario’s left-and-right movements across the girders of the first stage. Fire Man’s stage calls back to that era with a twisting layout that I don’t think is seen anywhere else in the series. As such, you get a lot more mileage out of the stage without it feeling padded, as every nook of the level is designed to make the most of the threats you face here.

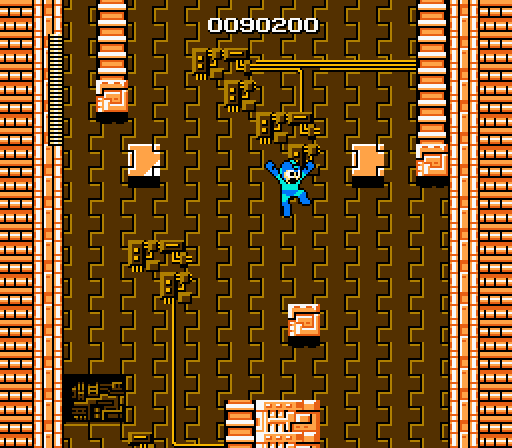
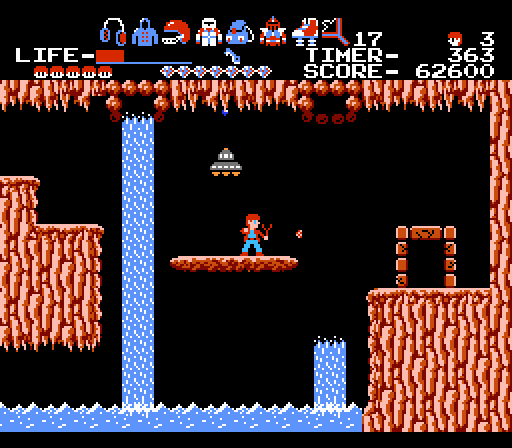
At the high point of the stage, the vertical fire vents are complemented by fiery red variants on the beams in Elec Man’s stage. Yeah, they’re palette swaps, but it works.

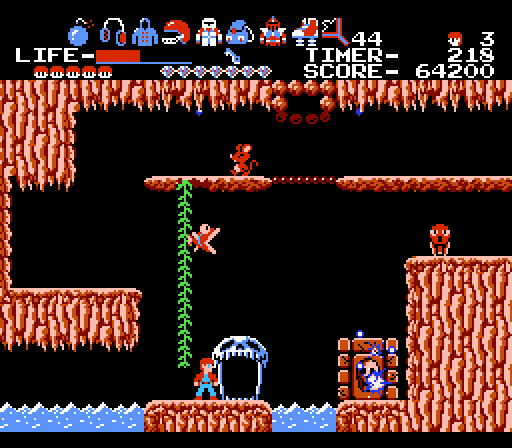
Less successful is this sequence, where a series of (twisting, sinuous, wave-like) ducts conduct flames across the main path. These are the same bursts of fire that Fire Man throws at you, which makes for both economy of cartridge storage space and a nice touch of thematic consistency, but unfortunately they also travel at high speeds. It’s extremely difficult – possibly impossible? – to duck through these spaces without taking a hit.

You can, however, breeze through with the Magnet Beam. I question the design of a sequence that’s impossible to clear without the use of an optional tool, but on the other hand this area is a lot less hateful than the pits in Ice Man’s stage. I suppose it’s all relative.

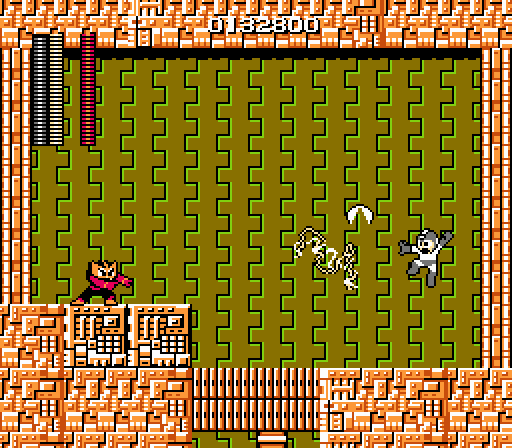
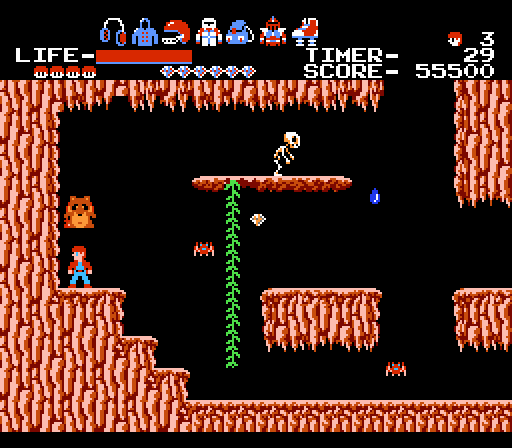
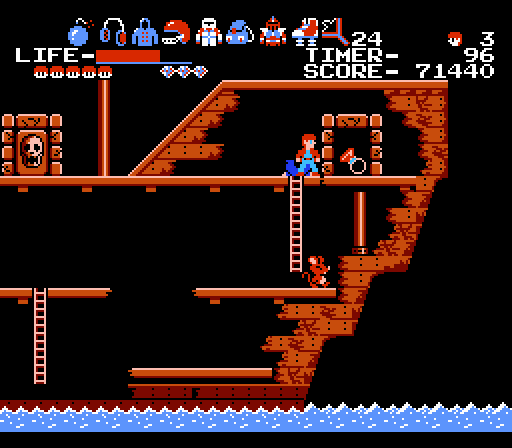
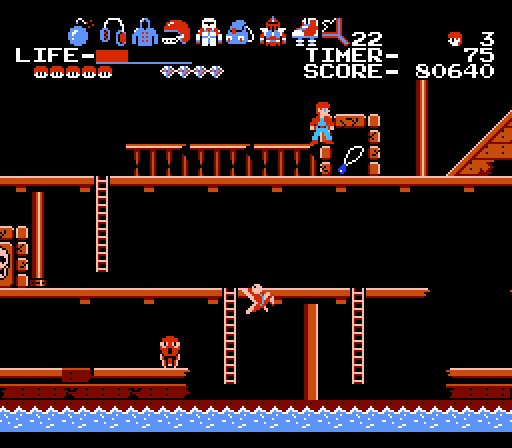
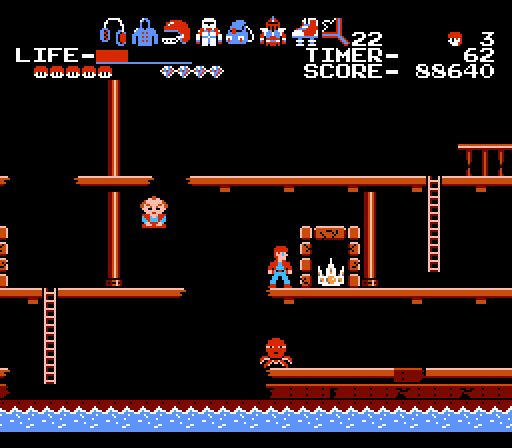
The other feature that defines Fire Man’s stage is a preponderance of small platforms over seas of molten fluid or empty pits. While none of these create as tense a sensation as the tiny single-block platforms in Elec Man’s stage, they test your evasion and preemptive attacks. The Tackle Fires above rise from the flames in every area dotted with narrow footholds, descending again from the ceiling toward your current position. While the platforms themselves aren’t particularly dangerous, the hazards from above approach at oblique angles and can potentially bump you into the flames – that excessive damage knockback at work.

Fittingly, the Ice Slasher makes a helpful weapon against the Tackle Fires, too, capable of freezing them mid-air. And there’s even a massive energy refill right before the Robot Master chamber to encourage use of the Ice Slasher throughout. Cheap-hit ducts aside, a strong level.

The Anatomy of Mega Man | 7 | Slippery slope

While I will defend the honor of the Magnet Beam to the death, there is really no justification for Ice Man’s level. It is not a good or fun level. It combines one of the infamous worst things about platformers – low-friction iced surfaces – with the game’s two most irritating unique mechanics. By far, it represents the low point of Mega Man. Everything that is terrible or simply not fun about Mega Man has been quarantined in this stage.

If each level is meant to teach newcomers a lesson about the game, the Ice Man stage’s teachings amount to, “You should go play something else instead.”

But first things first. Ice Man himself waits at the end of his self-titled stage, and he’s one of the heaviest hitters in the game; his weapon, Ice Slasher, tears into you with the same force as Elec Man’s Thunder Beam. Thankfully, the reverse is true as well: The Thunder Beam utterly shreds Ice Man, hitting him every bit as hard as it does you. Three hits and he’s down.

Ice Man’s use of the Ice Slasher differs noticeably from Mega Man’s. Where you fire off a single blast that tears across the screen as quickly as a P bullet, Ice Man fires three at a time in a stair-stepped configuration. However, these projectiles move at what I can only refer to as glacial speed, inching across the screen and offering a deft player just enough leeway to jump between them safely.

Ice Man himself is similarly sluggish. Of all the game’s bosses, he’s easily the least mobile. He generally sticks to the back half of the room rather than bum-rushing Mega Man. Rather than going for the melee strike, he prefers to use his weapon and kindly offers enough room to maneuver around his attacks. What a swell guy. Aside from moving back and forth in his preferred quarter of the screen, he also leaps up and drifts slowly to the ground while firing ice daggers in groups of three – first in an ascending stairstep pattern, then descending. Repeat ad nauseum.

Since you need to stay busy dodging his projectiles (and remember than in the original Mega Man, a boss’ on-screen attacks continue to follow their path and remain a hazard even after you destroy the boss himself), the Thunder Wave proves quite handy here. Its wide sine wave pattern guarantees that you’ll hit Ice Man regardless of his position provided you point in the right direction when you shoot.

Fittingly, the Thunder Beam comes in handy throughout the stage. For instance, the Crazy Razies early in the stage can be a headache if you don’t destroy their upper bodies first… but the Thunder Wave hits them square in the face, trivializing the threat. Likewise, the Pengs that attack in the second half of the first portion of the stage fly in a sine wave pattern, and the Thunder Beam’s huge hit box means it’s practically guaranteed to take out a Peng provided you attack from the center point of its wave pattern.

Thunder Beam don’t do jack to help out with the slippery ice that covers all the dry (that is, not immersed in water) surfaces of this stage.

Thunder Beam don’t do jack here, either. In fact, it’s no help whatsoever in the second half of the level, which makes you pine for the slippery-ice portion of the level.

Welcome to Mega Man‘s most irritating indigenous mechanic: Disappearing blocks. Yes, they also appear in Elec Man’s stage, but those instances are considerably more mild than what you encounter here. First, those blocks appeared in neat, tidy formations, whereas in Ice Man’s stage they seem somewhat scattershot, forcing you to master six to eight consecutive leaps that involve multiple heights as well as a slight bit of backtracking – sometimes you need to leap backward in order to find purchase. Secondly, Elec Man’s disappearing blocks appeared on screens without any hazards besides falling, whereas here the ground beneath the blocks is patrolled by Spines. And, finally, these jump sequences are considerably more protracted than the ones in Elec Man’s stage.

No, the Thunder Beam won’t help here… but this screen (and the similar one preceding it) definitely make the case that Elec Man’s stage is meant to be one of the last you tackle in the your Mega Man playthrough. If you start with Cut Man (or earlier up the proper chain of progression) and follow the path of least resistance, you’ll come to Ice Man’s stage with the Rolling Cutter and, quite possibly, the Magnet Beam. The former takes care of the Spines, while the latter lets you completely skip past the disappearing blocks. The blocks phase in as platformers that take you up over high walls obstructing your way, but you can just lay down a couple of successive Magnet Beam shots and not have to worry about the vanishing blocks.

140428-megaman41

The Magnet Beam is almost incalculably essential in the area that appears next: A wide expanse of gaping pits linked by a series of floating platforms. Alas, this is the single worst part of the game thanks to a collision of poor design decisions as well as crummy programming. A double whammy!

The eyes on these orange platforms denote the fact that they are, in fact, enemies. They drift in floaty circles, occasionally moving close enough to one another that you can hop across them to advance. But because they’re enemies, this causes two complications. One, those little pipes on their flanks occasionally fire bullets across the screen. This poses no threat if the one you’re standing on fires, but if a platform opposite shoots while it’s drifting near your level… not only do you take a hit, the massive knockback that comes with damage (seriously, Mega Man slides back a whole tile and seems to be in a hit stun animation forever) means you’re probably going to reel right off the platform and into the pit.

Even if you manage to avoid these projectiles, the platforms themselves pose a terrible hazard. Thanks to their flaky hit detection, their neutral upper decks sometimes will unintentionally just sort of stop registering as ground, causing you to fall through to hit the dangerous robot below. Or else you’ll inexplicably take a hit and go sliding off from hitstun. They’re especially dangerous when they rise, since Mega Man doesn’t treat them as ground, and sometimes you’ll clip through the top as it climbs and die.

And to make matters worse, the entire time an endless stream of Pengs approaches from the right, forcing you to keep alert from an additional hazard.

It’s possible to get through this sequence without the Magnet Beam, but doing so feels like a stunt to prove how cool you are, like playing a naked run of Dark Souls or something. This part of Mega Man legitimately demonstrates poor design, and the one reason this is even slightly tolerable is that you can just lay down a bunch of Magnet Beams to completely bypass it. This is entirely by design; the column in the center of the pits contains a large weapon energy capsule to refill your Magnet Beam midway through.

Still, the presence of an out doesn’t redeem this portion of the level. Ice Man is not a stage for beginners.

The Anatomy of Games: The Game: The Sequel

When the original NES Remix came out, back in December or so, I referred to it as Anatomy of a Game: The Game. It almost felt like Nintendo took all those game design ideas I’d been writing about and turned analysis itself into a game. By breaking down old NES titles into their constituent components and making brief, standalone challenges of them, NES Remix showed why great old games (like Super Mario Bros.) work and why mediocre old games (like Ice Climbers) don’t.

The sequel arrives this week, and it too reveals some of the mysteries of how games work. But maybe not in the way you’d expect. NES Remix 2 shifts from black-box NES games to latter-day titles, and while those games are generally much better than the ones presented in the first Remix, they don’t work as well in this context.

I don’t expect everyone to agree with my take on the game. The reality of reviewing games is that it’s a subjective process, and everyone brings their own biases and expectations into that process. When a game cuts so close to someone’s minor obsession, those expectations naturally rise. I loved NES Remix because it basically turned the concept of a tutorial into a game. And the moment I realized NES Remix 2 wasn’t clicking with me came with the “challenges” (that’s challenges, as in more than one) that consisted of sitting passively and watching a game attract mode demo. Suddenly, NES Remix 2 was guilty of the same crime so many contemporary works are: Stumbling over themselves with passive instructions and tutorials. Tutorials are a sign of timid developers… or, to be more fair, of developers who have learned the hard way that many gamers are just too lazy or stupid to bother with things like “discovery” and “paying attention.” Every time someone asks why Metroid can’t crawl, an angel weeps as it plays another protracted forced tutorial sequence.

Don’t misunderstand, here. I don’t have a sociopathic hatred of game tutorials. Sometimes they have a place – some game concepts simply involve such complex concepts that you need a tutorial. But Kirby’s Adventure? Not really. Yet here we have NES Remix 2 teaching you about Kirby’s power-ups not by giving you a string of mini-scenarios in which you have to devour a specific enemy and use the resulting skill to accomplish something, but rather by making you watch the attract mode. It’s boring, and worse, it’s counterproductive. It’s always better to learn by doing, but NES Remix 2 – a game entirely about learning by doing and earning shiny stars for it – can’t stick to its guns.

The attract mode demos weren’t the main reason I found Remix 2 slightly disappointing, though. That would be asinine; we’re talking two events out of hundreds. Rather, they were symptomatic of the game’s main issue, which is that the games it hacks into pieces generally aren’t served well by that approach. The Zelda II and Metroid events that span multiple screens of the game and involve tasks like earning enough experience points to level up just don’t map well to minigames. To trot out the ever-popular games-as-food analogy, some games are like a candy bar, while others feel more like a glorious gourmet meal. You can enjoy the candy bar as a light snack on the go; whereas the six-course feast demands you sit and enjoy it as a luxurious whole. Unfortunately, NES Remix 2 tries to serve six-course meals as if they were candy bars, and it doesn’t do the material any favors.

It’s still a lot of fun, though. I mean, I gave it four stars our of five, and I’m the site’s review curmudgeon. It’s just not on the same tier of quality as the original NES Remix, which I scored higher… and the score disparity would have been even more pronounced if not for Super Luigi Bros., which is a simple idea done brilliantly. But really, it’s the difference between The Godfather and The Godfather Part II – not The Godfather Part II and The Godfather Part III. One is a slightly less brilliant take on the subject than the other, and neither is a disaster. And I wear my biases on my sleeves.

The Anatomy of Mega Man | 6 | Current events

The chain of weapon effectiveness versus bosses can be a tricky thing in Mega Man games. Sometimes it makes perfect, logical sense; other times, not so much. For example, Mega Man 6. How do you determine what the Yamato Spear is good against? It’s basically a pointy stick that embodies ancient Japan, which isn’t really a weak point, thematically speaking, against any of the bosses that appear in the game… so they arbitrarily decided to make it effective against Knight Man. Well, I hope it was arbitrary. Otherwise there’s a little cultural snobbery happening there.

Mega Man does its best, within its limited means. The entire chain of weaknesses draws its inspiration from rock-paper-scissors, so of course Guts Man’s Super Arm – which allows you to heave rocks at enemies – is good against Cut Man’s boomerang-like scissors. Alas, Mega Man lacks a Paper Man; and even Wood Man (who could theoretically be pulped into paper) doesn’t appear until Mega Man 2. So who does the Rolling Cutter work against? Elec Man.

“But why would scissors – which are probably made of metal! – be good against electricity?” you wonder. Well, most likely they’re not. But electricity is conducted by cables, and indeed the backgrounds of Elec Man’s stage frequently depict cables, wires, and other electrical conduits running between the various mechanical devices embedded in the walls. You’re not cutting Elec Man’s electricity; you’re cutting his cables. Tokuro Fujiwara, Keiji Inafune, and Akira Kitamura (and their team) put some thought into how the game’s mechanics fit together, and if you stop and think logically about it, you can actually puzzle out at least some portions of the ideal level sequence without the need to experiment.

140414-megaman32

As for Elec Man himself, he holds the crown for being the single most difficult Robot Master in the game. The only other boss who hits as hard as he does is Ice Man – three hits of their weapons will shatter Mega Man – but Elec Man’s behavior makes him nearly impossible to defeat unless you have the Rolling Cutter. Air Man has nothing on this guy.

The challenge that Elec Man poses comes from his erratic movements. He runs quickly back and forth in his room, pausing only to toss bolts of electricity at you. The Thunder Beam travels in a dense sine wave pattern that effectively makes its hit box about 50% taller than Mega Man and twice as wide. You can jump over it with perfect timing, but it moves quickly and Elec Man likes to throw them in rapid succession. Worse, he also likes to get right up in your face, which introduces the hazard of possible collisions while also greatly reducing the amount of time you have to react to his attacks.

Elec Man’s level reflects the boss’ high difficulty level. It’s a grueling, dangerous stage from start to finish. Top that off with a boss who can destroy you in seconds and you have a stage that clearly communicates the fact that it’s meant for experienced players, not as a first-time venture.


That being said, Elec Man’s stage still does a pretty respectable job of cluing you in to the tool you’ll need for victory. As noted before, the first screen you face places you at the bottom of a shaft lined by staggered platforms patrolled by Spines. The most effective weapon against Spines? The Rolling Cutter.

You can get through here without the Rolling Cutter, but the only other weapon that kills Spines is the Hyper Bomb. Otherwise, the most you can do is stun them for a few seconds – basically long enough to hop up to the platform, perform a tiny half-jump to bring you high enough to shoot the next Spine, then jump across to the next platform. The low height of the ceilings here requires perfect control so that you don’t bump your head and fall when you make the leap.

Without the Spines, though, the pressure disappears. The Rolling Cutter transforms this screen from nerve-wracking to breezy.

140414-megaman34

Likewise, the Rolling Cutter proves invaluable against these guys, too. They appear from the top left and bottom right in two packs of three and drift vertically toward the opposite end of the screen. When they pull even with Mega Man, they unleash a pair of electrical beams above and below him. If you have very, very good nerves, you can wait these out, but the slightest movement brings disaster – and sometimes the beams will hit you even if you think you’re situated safely (Mega Man is a bit glitchy).

Should one of those energy beams hit you, you’ll lose your grip on the ladder and plummet to the screen below. Given that Elec Man’s entire stage is one long ascent (with only two short interstices that scroll horizontally for a short ways), you definitely want to avoid losing that progress. Handily, the Rolling Cutter’s relatively slow movement and vertical drift make it great for taking out these guys. The Thunder Beam is even better, but obviously you won’t have that your first time through the stage.

140414-megaman36

At the pinnacle of the first leg of the ascent, past the enemies and ladders and beam emitters, you’ll reach Mega Man‘s indigenous, trademark act of hatred: Vanishing blocks.

Vanishing blocks – or perhaps more correctly, reappearing blocks – are single-block platforms that materialize and disappear in a regular, consistent patterns. Their predictability is your only advantage when dealing with them. If you can get the timing down and figure out how and where you should be jumping to, you can generally make it through these gauntlets with little trouble.

Unfortunately, they require excellent timing on your part, especially for instances in which you have to leap upward through the space a block will materialize in as it’s about to appear. If you mistime it, the block will phase in as you pass through its space, pushing you to one side or the other. This happens quickly and leaves little time for correcting your leap, and in a worst-case scenario (such as here, at the top of a tall shaft) it can push you into a pit, either killing you instantly in a vertically scrolling situation or just plain killing you if it’s a bottomless pit. Disappearing blocks are the worst.

The first instance isn’t so bad, but the second screen (which appears immediately above this one) forces you to dash across the blocks as they appear side-by-side (and quickly phase out) above a gaping chasm.

140414-megaman35

Eventually – once you reach the top of the first shaft and survive a tense gauntlet of tiny platforms leading to the second half of Elec Man’s level – you’ll reach the infamous Magnet Beam.

The Magnet Beam appears locked in behind a trio of rocks. The only way to reach it is to toss the rocks aside with the Super Arm or evaporate them with the Thunder Beam. Of course, what makes this tricky is that the first time through Elec Man’s stage, you won’t have the Thunder Beam. And those early trundles over the pits in Guts Man’s stage require a deft touch and good timing, and are far more easily bypassed with the Magnet Beam. So, the conundrum here: The Magnet Beam is extremely valuable, but in order to claim it you need to clear a high barrier to difficulty.

This isn’t quite on par with certain RPGs that give you an ultimate super weapon only after you defeat the most powerful enemy in the game (thereby negating the need for your prize), but it definitely comes from the same school of cruelty. That being said, the situation isn’t as backward as it would seem.

Experienced Mega Man fans tend to view the games in terms of simply clearing stages as efficiently as possible, then moving along to the next. And that’s fine. But your first time through any Mega Man game generally involves a fair amount of trial-and-error – not in a bad, obtuse way, but rather in a exploratory sense as you get a feel for the new mechanics, the unique hazards of each stage, and try to see which Robot Master you can fell without exploring the weakness chain. That fact held doubly true back in 1987, when Mega Man‘s any-stage-you-like approach was new and unfamiliar. Games that played like this were still fresh to the world, and certainly one that combined platform shooting mechanics and semi-nonlinearity demanded a great deal of experimentation from players.

Mega Man lacks a password feature or any persistence once you shut down the system. You weren’t meant to complete the game your first time through. As with nearly all games of this era, the idea behind Mega Man was that you’d play it a bit at a time, and as you went you’d familiarize yourself with its rules, the level layouts, and the behavior of enemies. Each time you played, you’d do a little better than the last until you could finally finish the game.

In that context, the Magnet Beam was there to intrigue. A first-time player wasn’t likely to simply sail on past it and reach Dr. Wily’s lair without it, because you would have played through Elec Man’s stage many, many times as you became familiar with the game. Every time you passed the Magnet Beam, you’d see it and wonder about it. Eventually, you’d experiment with the weapons that could break the walls barricading it and figure out how to claim it as your own. To that point, Mega Man is the only one of the original NES Mega Man trilogy to allow you to return to completed stages. In the course of playing, you’d have eventually claimed the Thunder Beam and, in using it, noticed that it could break the blocks that the Super Arm lifts. Or you’d have mastered the trundles in Guts Man’s stage and figured out the mysterious Super Arm. At some point, one way or another, you’d have unlocked the Magnet Beam. And once you’d done so, you’d have realized its value and made a point of claiming it in subsequent plays.

At least, speaking as someone who played through Mega Man when it was still the only game in the series, that was my experience.

The Magnet Beam setup isn’t without its failings – it can be missed – but I think those issues are more pronounced in the age of save states, where even official reissues of the game don’t require as much experimentation and dedication as the old NES cart did. Still, it’s important to keep in mind the era into which Mega Man came into the world. Its contemporaries were things like Milon’s Secret Castle, Castlevania II, Zelda II, and The Goonies, games where secrets were completely invisible and hidden and required pure luck or stubborn persistence to solve. Even Super Mario Bros. 2 (USA) demanded memorization and luck to find all the hidden Mushrooms and Warp Zones. By contrast, this is the solitary hidden secret in Mega Man – and it’s not even hidden, just blocked off!

Mega Man feels like a standard-bearer for transparent game design. While it wasn’t perfect (seriously, the Super Arm took me ages to figure out), the nuances of Mega Man‘s action came from the interactions of powers with the game world and the enemies within it. Nothing was tucked away or demanded chance or blind luck. While it wasn’t perfect, it was part of an important late-’80s trend of giving action games greater depth without compromising the integrity and fairness of their design.

140414-megaman37

Whether or not you pick up the Magnet Beam, you still have to deal with this guy, who proves that the developers hadn’t entirely ironed out the random luck from the game. While you have just enough time to scramble up the ladder at the lower left and fake the Big Eye out with a short hop (causing it to jump high enough that you can run beneath it), if you don’t know that trick you’re likely to just cling to the ladder and hope he goes sailing over your head as he jumps off the edge. And sometimes he does! But the ladder doesn’t register as solid for enemies, so if he passes through the ladder, he’ll smack into your head as he falls, damaging Mega Man and knocking you to the previous screen… which means you have to climb up and deal with him again.

And it doesn’t get easier once you enter the final antechamber to Elec Man’s room. You continue ascending – the only antechambers in the entire game in which you have to move upward – climbing a two-screen-high ladder surrounded by beam emitters that operate at close quarters on tight timing. You can make it to the top (and the deadly battle with Elec Man) if you move patiently… but if you screw up, you’ll plummet and have to make the climb again.

Definitely not a stage for beginners.

The Anatomy of Mega Man | 5 | Cut to the chase

About all Cut Man’s stage has in common with Guts Man’s stage is assonance. In terms of design – and particularly as a starting point for a newcomer to Mega Man – it proves to be far more effective. It doesn’t front-load unreasonably difficult platforming challenges, it offers a variety of hazards, and it offers several strong hints about how you should go about defeating the boss at the end of the level.

Cut Man himself may not be quite as simple to defeat as the game’s first boss as Guts Man or Bomb Man, but he definitely belongs in the easier half of the Robot Masters. His strategy essentially consists of running back and forth while pausing at the edges of the room to toss his enormous blade, which behaves like a cartoon boomerang: It flies away from him, loops back, and returns to his hand regardless of where he may be at the moment.

Interestingly, Cut Man’s blade is integral. Unlike the Rolling Cutter you earn from him, which you can fire off in rapid success, he wields only a single blade, which he wears atop his head. This limitation arguably means Mega Man is better at using Cut Man’s weapon than Cut Man is – but it also makes the battle against him fairly reasonable. While the blade is aloft, Cut Man’s only offensive maneuver is to tackle you (as always, collisions damage you but not your enemies). He’s easy enough to leap, but the real trick of evading him comes from the fact that the blade is zeroing in on his location while he tries to plow into you. It’s imperative to learn the blade’s flight pattern so that you won’t jump heedlessly into the thing as you try to evade his aggressive jogging.

Cut Man is weak to Super Arm. Conveniently, Dr. Wily housed Cut Man in room with two blocks that you can lift and chuck at him. This is excellent strategic thinking, along the lines of Wart from Super Mario Bros. 2 installing a vegetable dispenser in his throne room despite being fatally allergic to vegetables. Damage values are all over the place in the original Mega Man; just as certain Robot Masters can end you in three hits, these two blocks will take down Cut Man. The sequels would rebalance weapon attack values considerably, but for the first game the team was still getting the hang of things – and, remember, they came from an arcade background, which means the idea of fair game balance was utterly foreign to them.

Still, this isn’t amateur hour. Cut Man’s stage begins with a series of small buildings blocked up by those rock cubes that only the Super Arm can lift. You can’t get through this blockade without the Super Arm (or Elec Beam, but trying to beat Elec Man without the Rolling Cutter is one of the game’s most difficult tasks, so…), which means that you need to take the more laborious ladder route up and down if you haven’t defeated Guts Man.

On the other hand, if you do have the Super Arm, this stage opens with a perfect training ground. Not only can you create a shortcut by picking up the blocks that obstruct the way, you can easily take out the flying enemies who swoop down at you in a triangle formation by hucking the rocks at them. The blocks disintegrate in midair, creating a shrapnel spread that extends upward as it flies forward, essentially pelting everything within a 30-degree arc ahead and up. That’s precisely the correct angle of attack to wipe out the flying enemy formations. It’s a perfect opportunity to learn how this weapon works, not only demonstrating the advantage of using the right tool for the job but also prepping you for your fight against Cut Man.

Otherwise, this sequence teaches you how to jump and shoot enemies, because these guys keep circling back and forth and dive-bombing you until you die.

140414-megaman27

Ladders factor prominently into Cut Man’s stage, as much of the level involves an ascent. It’s not as aggressive about ladders as Elec Man’s stage, though; your ascent is broken up into different platforming tasks as you climb. Many of these enemies you face are predictable, pattern-based foes such as the turrets that emerge from their indestructible shells to fire at you and the red, lantern-like robots that move back and forth along a single track (either horizontal or vertical) at regular intervals. Amidst these foes, which can be beaten easily with patience, you also have more unpredictable threats like the blue Fleas that hop around erratically. A simple screen like this makes use of several of Mega Man’s basic skills and teaches players when to be aggressive and quick and when to be more patient – a simple but effective bit of level design and enemy placement.

Interestingly, you’ll occasionally come across these devices: Rolling Cutter dispensers. Blades fly out of the open slot, arcing upward toward Mega Man’s location. They have a fairly limited horizontal range, but they also spill out at a fairly rapid clip, so you need to time your movements to squeeze between blades, and keep moving once you commit to the action.

Aside from the flame pillars in Fire Man’s stage, these blades mark the only instance of a Robot Master’s weapon appearing mid-stage as an environmental hazards unconnected with any particular enemy. They’re strange yet interesting.

This screen is another example of really great level design: It seems utterly overwhelming at first, with four moving enemies that can  span the entire screen. But again, they move in a regular, predictable, limited, consistent pattern. You’re completely safe where you enter the screen, at the lower left, and will be in no danger until you take action. You can take out three of the enemies in a single action by tossing the brick in the center of the room with the Super Arm, though of course you need to make sure the robots are all in the proper places before you make the throw.

There’s a tradeoff involved in using the Super Arm, too. The brick is blocking the center robot and limiting its movement, keeping Mega Man safe if he sticks to the left. If you remove the block, it can traverse the entire screen, leaving you potentially vulnerable if you don’t destroy the robot immediately.

140414-megaman29

And finally, the obligatory Big Eye encounter. While this setup bears some similarity to the one at the end of Guts Man’s stage, with Mega Man dropping from above left and facing a big stompy robot approaching from the right, it stands apart thanks to the fact that you can chuck bricks at it. They do heavy damage to the Big Eye and make this encounter much less harrowing than the other.

In short, you can definitely see why Mega Man‘s creators placed Cut Man’s stage as the default cursor position on the level select screen. It presents first-time players with a number of diverse challenges, yet none that feel insurmountable. With the P cannon, Cut Man proves difficult but not impossible. Meanwhile, the abundance of interactive bricks that can be heaved with the Super Arm gives the player ample opportunity to practice with the weapon to which the stage boss is vulnerable. It works both as a first stage and a challenge to be dealt with further into the stage progression chain, and the experience varies considerably depending on whether or not you’ve beaten Guts Man. In a lot of ways, Cut Man’s stage is the gold standard for Mega Man level design, and the series would gravitate more toward this approach discipline than to the style seen in Guts Man’s stage.

The Anatomy of Mega Man | 4 | That means you have huge guts

As I mentioned before, Guts Man’s stage is a terrible place to begin playing Mega Man if you’re a first-time player. It’s a great starting point for an experienced pro, because it’s a good jumping-in point on the rock-paper-scissors ring of enemy weaknesses. I also like it because of the tricky lifts in the opening area – if I can make it past them without any trouble, I’m in the right “zone” to play Mega Man. If not, I should play a baby game instead. Like, say, Mega Man 2 on Normal difficulty.

Part of what makes the Guts Man level so poor for newcomers comes from the difficulty level of the lifts and enemies here, but really there’s a more fundamental design problem at work: Mechanically, Guts Man’s level doesn’t reflect the character.

Conceptually, Guts Man is meant to be a construction labor robot, clearing away heavy rubble, lifting debris, carrying materials. And, aesthetically, his level reflects this concept – it seems incomplete, a rocky canyon in which rough trestles hold up broken bridges and belt lifts drop their contents due to damage along their tracks. But in terms of hazards, nothing really mirrors Guts Man’s skills or style.

Guts Man attacks by leaping at you with such seismic force that Mega Man is stunned and helpless by the impact, leaving you immobile as the tremors cause a boulder to fall into Guts Man’s hands for him to toss at you. Even if you manage to avoid the tiny quakes’ effects, the boulder projectiles shatter upon impact with the floor, disintegrating into a spray of debris that covers the back half of the room – a tricky hazard to leap. He’s not tremendously difficult to fight once you get the timing and pattern of his jumps down, but unlike many of the other bosses in Mega Man, nothing he does has precedent in his stage.

More crucially, there’s no tipoff whatsoever to his r-p-s weakness, Bomb Man. Sure, it makes sense from a logistical standpoint that the construction robot would be vulnerable to the demolition robot’s weapon (albeit nihilistically slavish to the concepts of entropy, suggesting that it’s easier to destroy than to build). However, nowhere in Guts Man’s level does the Hyper Bomb feel like a more efficacious solution than just shooting as fast as possible with the default P beam.

For instance, if the Hyper Bomb could crack a Metool’s shell, you’d have all the info you needed right away as your first encounter puts you up against a stack of these guys. But because of the delay on the bombs’ fuse and the very slim timing of the Metool’s vulnerability, it’s not a particularly effective combo. While the placement and behavior of these guys do convey some valuable strategic data, it falls more into the category of general gameplay mechanics than stage-specific rules.

Likewise, the most infamous element of Guts Man’s stage – the broken trundles – in no way relate to the specifics of Guts Man or his weakness. On the contrary, the most effective way past these devices (short of learning their quirks and timing) is to use the Magnet Beam to create a series of platforms and bypass the chasm altogether. But to wield the Magnet Beam, you need to have either (1) beaten this stage and Elec Man’s or (2) beaten Elec Man’s stage twice. Neither of these strategies is particularly helpful if you’re making your way along a fresh playthrough, and the former strategy is utterly idiotic since anyone who can beat Guts Man’s stage without the Magnet Beam doesn’t need to come back once they have the Magnet Beam.

Needless to say, the Hyper Bomb accomplishes nothing whatsoever here.

The Piket Men are the closest this stage comes to giving any kind of tip-off to the boss. They bear a vague visual resemblance to Guts Man, combining Metools’ hard hats with an anthropomorphic body, and they toss projectiles, kind of like Guts Man. Narratively, they’re a nice touch – mining and excavation robots gone berserk – and they pose an interesting challenge since their steady stream of pickaxes homes in on Mega Man’s position and forces you to remain in motion while firing and dealing with passive hazards like pits.

Additionally, the Hyper Bomb can take out these guys in a single hit. So there is a touch of hint-through-design happening here, but not in a particularly accessible way. The Hyper Bomb leaves you fairly helpless while you wait for it to explode, meaning that all the while you wait, you’re dealing with a fusillade of picks. The arc of the Hyper Bomb limits its range, so you have to get in close to a Picket Man in order to toss one in the first place, and in most cases the presence of pits surrounding a Picket Man means you need to be precise with your throw and double-back once you make the toss. Unfortunately, the rapid speed of the pickaxes and Mega Man’s slight inertia when he reverses direction leaves you likely to take a hit once you turn around. Ultimately, it’s far more effective to use your basic weapon and inch forward while pumping projectiles into these guys, and you may never even think to try a Hyper Bomb here. Oh well.

Beyond the Picket Men, the level offers mostly passive hazards: A drop down a shaft lined with spikes.

140414-megaman24

You face only one last enemy before entering the antechamber before the boss: A Big Eye, which jumps at you. Big Eyes appear in several stages, and they’re the most dangerous and durable enemies outside of bosses. They can soak up a ton of damage, and three hits will do in Mega Man. Their only offensive maneuver is to jump toward Mega Man; they can’t shoot, and they operate on a very consistent timer. That’s enough to be tremendously dangerous, though; a few collisions will bring the action to a skidding halt.

Big Eyes have no special vulnerabilities, and they have only a single reactive behavior based on the player’s actions: If you jump right before a Big Eye does, it’ll perform a higher jump than usual – high enough to allow you to run beneath it safely. If you have the Ice Slasher, you can freeze it at the peak of a high jump to breeze past it (or just freeze it to pour a ton of bullets into it while it stands motionless).

In this case, the design of the level combines with the behavior of the Big Eye to create an extremely difficult situation. In fact, this is easily the trickiest Big Eye encounter with the game (another reason Guts Man’s stage sucks for newcomers). Because the Big Eye jumps upward as it advances on you, there’s very little room on these small steps to run beneath it. It’s possible to make it through this encounter without taking damage, but it requires finesse and a touch of nerve.

Beyond the Big Eye you’ll find the short connective anteroom that precedes each boss room. Unlike in later Mega Man games, these usually span more than a single screen and contain enemies. If you die against the boss, you begin at the entrance to the anteroom, so it’s functionally a checkpoint.

The Guts Man battle unfolds as described above, and defeating him earns you the Super Arm… for whatever that’s worth. (Spoiler: Its worth becomes evident in Cut Man’s stage.)

The Anatomy of The Goonies | 4 | But I’m not a Goonie

After a short interlude stage crammed full of hidden diamonds and skeletons – or else after leaping over a giant cliff with Data’s spring shoes – Mikey Walsh reaches the fifth stage. The game continues to do a nice job of taking key story moments and scenes from the film and turning them into action set pieces; certainly it’s a damn sight better than the standard NES licensed platformer, which tended to have practically nothing whatsoever to do with the game outside of the sprite design.

140326-goonies19

Granted, there’s some out-there material, like the inexplicable bonus raccoon you can find, but still.

140326-goonies20

Stage five is the next-to-last level of The Goonies, your last stop before reaching One-Eyed Willy’s hidden boat. In the film, the final run up to the boat involved the kids sliding down chutes of water; here, that translates into hazardous waterfalls in the background. Also, there’s that whole deleted scene after the chutes involving the kids pretending to freak out about a fake rubber octopus, and hey – the new enemy in this stage is an octopus. (Also, there are fish that leap out of the water, not unlike the Cheep-Cheeps in Super Mario Bros.)

140326-goonies21

You can also collect a UFO because… video games?

140326-goonies22

Stage five is considerably more compact than the past few stages. Rather than sprawling across multiple screens, it features a much higher density of integral hazards; aside from the dangerous critters that wander the platforms, you also have to contend with the waterfalls (which hit hard, not unlike the stone counterweights in the previous level), falling rocks, inexplicably deadly water droplets, and so forth.

Now, if you happen to have collected the various protective items hidden along the way, stage five becomes fairly trivial. All you have to worry about are the creatures, passing with impunity through the other obstacles. Because the level design is so dense, you can collect the keys and kidnapped Goonie in about a minute. The challenge level of this stage really comes down to how well you’ve sniffed out the hidden secrets prior to this point – basically, the first time you reach this level, it’s incredibly difficult. But the more times you play the game and more thoroughly you learn its secrets, the less trouble you’ll have here.

140326-goonies23

And, with the waterfall caverns and subsequent connective corridor complete, Mikey reaches One-Eyed Willy’s ship. I don’t know that his boat was ever given a name in the film; let’s just pretend it’s called Revenge. He won it from a dread pirate in a game of dice.

Final stages often have a gimmick of sorts, and The Goonies is no different. Unlike the other levels, you don’t need to gather keys here in order to move on. The condition to complete this stage is simply to locate and rescue Andy, newly inducted into the Goonies order. She appears in one of four safes at random, and as soon as you open her safe and “collect” her, the level ends. However, the stage also contains a number of valuable treasures scattered at random throughout the other safes, so it’s worth collecting them first so you’ll work your way closer to an extra life for the second loop of the game.

140326-goonies24

This is more easily said than done; this stage begins with a mere 100 seconds on the clock, and while it’s relatively small (even compared to stage five) it has a fairly intricate layout that involves lots of obstacles and climbing. If you find Andy and pass her over in order to gather the treasures first, you could easily run out of time before you make your way back to her.

140326-goonies25

Every enemy type in the game comes out for this stage: Fish, octopi, mice, and of course the Fratellis. Despite the lack of passive and environmental hazards, this level puts your twitch skills to the test. If you’re really good, you can find a couple of hidden guys. There’s a weird-looking dude that presumably is meant to be Sloth. And then there’s this Japanese guy with a samurai topknot kneeling and bowing. I honestly have no idea.

140326-goonies26

With Andy rescued – no word on what happened to Stef, though hopefully she escaped on her own steam and blew off the Goonies so she could go crab spelunking in local barrels – the game comes to an abrupt end. Mikey, Sloth, and the rescued kids stand on the beach and watch Revenge sail off into the sunset. The end!

Well, kind of. The game enters a second loop in which more enemies spawn (for instance, both Fratellis can appear on-screen at once) and your collectibles are reset to zero. The second loop either moves the collectibles to new areas that I can’t seem to find or else does away with them altogether, so it’s either much harder (or maybe impossible?) to beef up with layers of defensive gear. Whatever the case, the second loop is seriously tough – I’ve made very little progress into it, despite having learned quite a lot about the game in the course of writing this series.

So, The Goonies. A pretty decent little platformer for its era, more typical of 8-bit PC action games than the more linear and limited design of most NES games – but decidedly one that looks and feels like an NES game. You can see the designers striving toward something deep and excellent here… it didn’t quite work out, but they tried. Fortunately, many of the underlying ambitions here found purchase in the sequel, which we’ll explore in due course. Still, it’s a fun little action game, one of the more solidly made of its particular NES/Famicom vintage, and I could see myself having been quite a fan had it made its way to the U.S. on the NES itself. C’est la vie!

The Anatomy of Mega Man | 3 | Color my world

Why, hello! Let’s talk some more about Mega Man. And its weapons.

Ice Slasher

Easily the most misleading weapon name in the game, the Ice Slasher does not in fact slash. Unless you use it against Fire Man, who is weak to its icy stylings, the Ice Slasher inflicts no damage whatsoever on foes. Instead, this tool – and I stress tool, because it really doesn’t constitute a weapon in any real sense of the world outside of two limited situations in the course of the game – clearly takes its cues from Metroid‘s Ice Beam. Which would make sense; if you were designing a Famicom platform shooter in mid-to-late 1987, where else would you look but the meatiest, most intricate, most revolutionary expression of the genre to date?

Like Samus’ Ice Beam, the Ice Slasher freezes foes in mid-action. It’s less about turning something cold than inflicting a zero-point stasis on that object, rendering it complete immobile for a brief time regardless of where it may be at the moment. Stationary, running, falling, leaping, whatever – it arrests an enemy, including its inertia, until the effect wears off. Unlike the Ice Beam, however, this weapon doesn’t work like a toggle; shooting a foe a second time once it’s frozen has no effect. The second shot doesn’t render damage, and it doesn’t unfreeze the enemy. However, Mega Man can switch to a different weapon during the freeze duration to pump a frozen foe full of plasma (or peas?), making this device functionally different from, say, Mega Man 2‘s Time Stopper.

Ice Slasher also has the ability to freeze the fire columns that appear early in Fire Man’s stage (and Dr. Wily’s lair), which once again repeats the motif of Mega Man tipping you off to a boss’ weakness with the sandbox elements that appear throughout a stage.

Fire Storm

Really the game’s only weapon to offer a reasonable go-to alternative to the P shooter, the Fire Storm combines reasonable offensive, a low cost for use, a basic movement pattern (the projectile flies straight ahead at a rapid clip), and a moderate defensive element to be quite a helpful device. While expensive enough to use that you can’t make it your new basic weapon in every stage, the Fire Storm works well in most situations.

It’s particularly useful against small, speedy robots with erratic patterns, such as Fleas: The projectiles move quickly and have a wider hit box than standard arm cannon bullets, so they cover a reasonable swath of screen quite nicely. Meanwhile, every time you activate the Fire Storm, a small circular projectile spins rapidly around Mega Man, inflicting damage on anything it touches during its brief orbit. If a quick enemy slips past your cannon fire, the shield bit is likely to take it out.

The Fire Storm is most powerful against Bomb Man. And where do Fleas appear more frequently? That’s right, toward the beginning of Bomb Man’s stage. Honestly, the game is its own strategy guide.

Hyper Bomb

At the other end of the utility spectrum from Fire Storm is the Hyper Bomb, which offers devastating power in a package that practically guarantees you won’t be able to connect with it.

When you “fire” Hyper Bomb, you actually produce a gigantic bomb out of thin air and chuck it in a short, low arc. It’s very cartoon-like. It’s also very impractical, as the bomb doesn’t explode on impact; it’ll pass right through an enemy, bouncing slightly as it burns up the momentum of your toss and comes to a rest. Once it’s stopped moving, it explodes.

The explosion is admittedly powerful and the splash effect is quite wide, so if you manage to time it right the Hyper Bomb just shreds bad guys. The problem is in the timing, though. Few enemies in this game are stationary, and those that remain fixed to a single spot tend to pour bullets onto the screen (such as Screw Turrets) or else spend most of their time securely buckled down beneath some kind of shield (Metool helmets, Sniper Joe shields, etc.). Throwing a Hyper Bomb leaves you vulnerable to the former type’s attacks as you can’t switch between weapons while a bomb is on the screen, and it forces you to try and time your attacks against the latter type to fall within their vanishingly brief windows of opportunity.

The Hyper Bomb can be situationally useful; it’s the only device other than Rolling Cutter capable of destroying a Spine, so in areas where Spines patrol narrow ledges or wells, the wide splash effect of the bombs and the sluggish default movement of the Spines works to your advantage. Otherwise, though, you’ll probably only whip this stupid thing out to fight Guts Man, who is weak to its explosions.

140326-megaman018

Magnet Beam

Bafflingly, the Hyper Bomb doesn’t even shatter destructible walls the way the Thunder Beam does. Which means, idiotically, you can’t use it to get the final “weapon” in the game: The Magnet Beam.

The Magnet Beam is weird. It’s clearly a precursor to Mega Man 2‘s Items 1 through 3 and Mega Man 3‘s Rush devices, but its presence in the game feels haphazard. It appears in a seemingly random location during the climb up the middle portion of Elec Man’s stage, hidden behind a few blocks that can only be cleared away with the Thunder Beam (which obviously you won’t have during your first fight through Elec Man’s area) or the Guts Arm (which you’re not likely to have if you take the “default” order of bosses and take on Cut Man first and Guts Man last). In fact, until you get really good at the drop lifts at the beginning of Guts Man’s stage, you probably can’t even clear that level until you acquire the Magnet Beam!

Worse, once you reach Dr. Wily’s lair, the area above requires you to have the Magnet Beam in hand – there’s no other way to reach the latter high in the ceiling. But once you get to the Dr. Wily phase of the game, you can’t exit out of his stage, even at the Game Over screen. So if you pass up the Magnet Beam, you render the game unwinnable. Whoops.

As tools go, though, it’s worth acquiring as quickly as possible. The Magnet Beam fires out a harmless line of persistent beams that allow Mega Man to hop aboard and use them as platforms. The rays only stay on screen for a few seconds, and it can be tough to gauge their presence thanks to the NES’ hardware quirks (the console had very limited capabilities when it came to rendering multiple sprites on the same line, so the beams flicker to the point of near-invisibility while they’re active). But despite these drawbacks, the ability to create your own platform is invaluable in certain areas. The drop lifts in Guts Man’s stage, for example. Or the vast gulfs of empty space with those stupid glitchy attack platforms in Ice Man’s level. Or the vanishing block mazes.

In fact, that’s the saving grace for the Magnet Beam/Dr. Wily design oversight: The tool is so useful in certain annoying stages that any sane player will prioritize its acquisition to avoid having to deal with the game’s more annoying platforming sequences. Despite its flaws, the Magnet is an interesting element that echoes the influence of arcade-style action adventure games like Tower of Druaga and, yes, The Goonies, giving the player an extra tool for ease of play that exists outside their standard arsenal. Unfortunately, it’s not optional, even though it’s kind of presented that way… but the team learned from their design mistakes for future games. And isn’t that what sequels are all about?

The Anatomy of Super Metroid in print, just in time for its 20th anniversary

Per usual, a revised version of some of this site’s content has magically become a print volume. And a PDF, for those allergic to print.

anatomymetroid2cover

The Anatomy of Metroid, Vol. II concerns itself entirely with the workings of Super Metroid. Fittingly, since it’s the game’s 20th anniversary. It’s available in three formats at the moment:

Hardcover via Blurb: $56

Paperback via Blurb: $39

Late addition: B&W pocket paperback via Blurb ($12.50)

PDF via Gumroad: $5+

Yes, I’m now three books behind on getting these into a compact, affordable, paperback print version. I really ought to get on that, since those mini-paperbacks are the only books that actually sell. With these expensive large format books I usually just barely manage to kick over enough sales to pay for my own library copy. Ah, hilarity. Edit: I threw the pocket edition together this morning before starting work. I’ve also put up a landing page for this and the other Metroid book.

I don’t know why I’m so hooked on turning these things into print, but I do love it. This volume goes for a much denser layout than the last book, which decreases page count and thus cost. The design this time around was inspired in part by the cover to Talking Heads’ True Stories and in part by those Chilton car manuals my father owned when I was a kid. The cover art is based on an image sourced from Critiques4Geeks.com, and of course the interior screenshots are courtesy of VGMuseum.

Incidentally, Blurb has a coupon good for the entirety of April: Through the end of the month TAKE15% will save you – yes! – 15% off your total purchase. Not sure what the limits on quantities are on that, but there you go.

Thanks as always for your support.

Late realizations about Super Metroid

I haven’t posted here in a while because my usual Anatomy time has been spent assembling Super Metroid into a book. Unlike Metroid Vol. I, Metroid Vol. II will contain a fair amount of supplemental material. Nothing amazing, just a dozen entries or so of descriptive or summary text about bosses and regions. Still, as I’ve been writing this extra content, a few little details about Super Metroid bonked me on the head.

First, the Wrecked Ship is obviously a giant rip-off of the derelict in Alien. I guess that’s no real revelation, but it had never occurred to me before. Phantoon, I suppose, plays the role of Space Jockey. This is all in a happy world before Prometheus made a hash of Alien‘s back story, of course.

Secondly, it struck me that the game’s creators may have intended Draygon not to be the parent of all those evirs that swim around it but rather as some kind of mutant evir/metroid hybrid. After all, its room is directly beneath the space pirate lab where they cloned metroids to create moctroids. And while it does resemble a giant evir, it also bears some obvious similarities to alpha metroids: The more pronounced spherical belly (aka weak point), the claw-like appendages, the tiled carapace on its back, its metroid-like habit of attacking Samus by clutching her until she inflicts enough damage that it lets her loose. So does that mean…

140403-evir

It’s an interesting idea. But maybe I’m giving the designers too much credit… or maybe I shouldn’t write this stuff while my bloodstream is packed with cold medication.

It also doesn’t explain the freaky skulls on Draygon’s head. Because seriously, what the heck.

The Anatomy of Mega Man | 2 | Any color you like

Even more important in the equation of how to play Mega Man than the cues provided by the level design are the workings of the titular hero himself. While Mega Man does indeed emerge into this world with a terribly minimal move set, that alone doesn’t define the limit of his abilities. The entire premise of the entire Mega Man franchise, regardless of which series we’re talking about here, is that “Mega Man” in every incarnation possesses supposedly limitless potential.

This being a video game, of course, that doesn’t mean he has limitless potential as an artist or undertaker or ballerina or politician. Or maybe he does? But all he does with that infinite sense of possibility is blow things up. Mega Man wields the ability to mimic the capabilities of other robots, which in video game terms means that when you beat one of the six Robot Masters, Mega Man acquires the ability to use their weapon (or at least a variant version of it). Each weapon you add to his repertoire operates on its own energy meter, which can be refilled by collecting a weapon power capsule, completing a stage, continuing, or certain other factors. Some master weapons are more practical in combat than others, and many of them have unique tool-like capabilities.

However, the master weapons possess another important trait: Each of them is super-effective against at least one of the other Robot Masters. The clue is in Mega Man‘s Japanese title, Rockman. The special weapons operate within a rock-paper-scissors circle of weaknesses, though here you have six variables to deal with instead of three. The principle remains the same, though: Acquire one Robot Master’s weapon and you suddenly gain the upper hand against another. A key element of playing a Mega Man game comes in figuring out exactly which boss is easiest to defeat with Mega Man’s default blaster and the proper sequence in which to tackle subsequent stages from there. By the end of this game, Mega Man can still run, jump, climb, and shoot in two directions. But he can also chuck bombs, belch fire, freeze enemies in midair, toss rocks, and more. While the master weapons mainly come in handy against Robot Masters here, they do have a number of situational uses as well.

P

Mega Man’s default weapon is the only one that carries infinite energy. As long as Mega Man hasn’t been blown up, he can use the cannon built into his arm. In the menu screen, it’s designated with the letter P, which means… well, no one knows, actually. Plasma? Projectile? Pitiful? Peashooter?

Peashooter is the most fitting moniker, if admittedly the least likely. The arm cannon’s default attack consists of a stream of small, oblong pellets with a slightly yellow cast. In a nice touch, weapon energy capsules cycle through colors to reflect Mega Man’s current power – he changes colors when he swaps out for different weapons – and the P cannon, which operates off Mega Man’s internal battery or whatever, fires projectiles that are the same color as health capsules. Mega Man can fire up to three Ps (peas?) at a time. The projectiles pass through all objects except enemies, which either absorb the bullets as they take damage or reflect them back at an oblique angle.

There are very few enemies the P cannon can’t harm. All Robot Masters are vulnerable to the gun, though some of them deal such disproportionate damage in return that there’s no sense in going head-to-head against them without something better, unless you just have something to prove. Armored or shell-covered foes are completely safe from Mega Man’s basic cannon fire until they expose their weaknesses.

While not a powerful weapon, the P cannon proves to be extremely versatile. As is fitting for the game’s basic weapon, it’s useful in nearly any situation, though not always optimal. Much of the strategy of the game boils down to determining when a different weapon has more utility, and balancing energy usage for those alternate tools.

Rolling Cutter

Essentially a boomerang that looks like Pac-Man, you acquire the Rolling Cutter from Cut Man. While moderately more powerful than the P cannon, Rolling Cutter has two advantages: First, Elec Man is almost impossible to defeat without it. Second, the Rolling’s path describes an arc when you throw it. It rises up, curves back downward, makes a sharp U-turn while continuing to drop, and finally twists back upward as it returns to Mega Man. Or rather, returns to its starting position; if you move after firing a Rolling Cutter, it will return to the point from which it was thrown instead of tracking Mega Man’s movement like, say, the boomerang in Zelda.

The looping movement of the Rolling Cutter makes it situationally useful, primarily for hitting low enemies. Because the blade’s hit box is much, much larger than those (P)uny little bullets the default weapon fires, it covers quite a wide swath of screen as it flies. It may swing wide of small enemies directly in front of Mega Man, but it has a remarkably large effective area. Really, where it comes in handiest is in dealing with small enemies who are too low for Mega Man’s standard attack to hit – basically, the Spines that show up early in Elec Man and Ice Man’s stages.

By no small coincidence, Rolling Cutters are the one weapon that works against them rather than simply stunning them. Also not a coincidence: Elec Man is weak to Rolling Cutter, and his stage begins with a throng of Spines, which can be destroyed with Rolling Cutter. This is a conspicuous tip. If you can clear out the first screen of the stage, you’re properly equipped to take out the boss.

140326-megaman013

Super Arm

The Super Arm, acquired from Guts Man, is the most situational weapon in the game. It does not allow Mega Man to perform any sort of direct attack by its own nature. It has no ammunition, and it doesn’t let you punch dudes. Instead, the Super Arm only allows you to lift and throw certain objects – special boxes located in specific places throughout the game. Without those boxes present, the Super Arm is 100% useless.

Even when you do find the requisite boxes, the Super Arm comes with severe limitations. Once you lift a box, all you can do is stand in place or throw it. You can only throw it straight ahead, which will cause it to shatter into multiple fragments that fly forward in a predetermined and (somewhat) wide spread. But that’s about it. Once you run out of boxes, you’re pretty much back to being helpless. Guts Man, of course, doesn’t have to deal with this limitation. So maybe Mega Man doesn’t command quite as many infinite possibilities as the rumors suggest.

The Super Arm does come in very useful in two locations where boxes form deliberate obstructions. However, you can also use the Thunder Beam to shatter boxes, so… Super Arm is kind of lame.

Thunder Beam

Speaking of the Thunder Beam, it is by far the most ludicrously powerful weapon in the game. It’s as devastating as Super Arm is worthless. And you know this to be true as soon as you acquire it, because Elec Man can destroy you in three shots, which he fires off in rapid succession.

But unlike Super Arm, Thunder Beam is even more amazing in your hands than in its original owner’s. While Elec Man can blast you with rapid bolts of electricity, when you use Thunder Beam it shoots in three directions at once. Mega Man doesn’t have many options for vertical attacks in this game, so the tripartite capabilities of the Thunder Beam prove to be extremely valuable – especially in stages where you’re climbing ladders (though admittedly the first of the two big instances of this comes at the beginning of Elec Man’s stage, which obviously means you won’t have acquired his weapon yet). It’s both powerful and versatile, capable of hitting enemies that would otherwise be unreachable.

Not only does the Thunder Beam pass through walls, it also passes through enemies rather than being absorbed. This ties in with the game’s most infamous exploit, which takes advantage of the Thunder Beam’s persistence, long length, and the fact that damage against foes is registered anew each time you unpause the game to allow you to destroy any enemy that takes damage from the Thunder Beam in a single shot by rapidly pausing and unpausing the game. But, honestly, even without this particular cheat, it’s still the most devastating item in Mega Man’s arsenal.