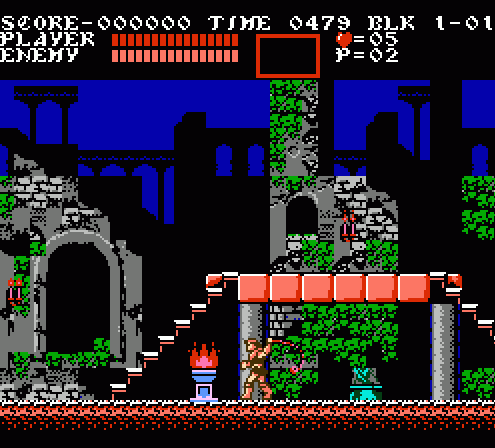
So we have the initial run-up of Block 1-01. In Castlevania, this took place outside the castle, and here we have an initial moment of whip-upgrading in a hazard-free zone… but at the end of this screen a pair of bone-throwing skeletons appear. For comparison, these guys didn’t show up until Block 07 of Castlevania. Before you even make it to the first screen transition, you’re already facing enemies from the original game’s third level. Ambling zombies and lazily drifting bats will show up in time, but right here you see your first hint that Dracula’s Curse won’t be easy.
The first screen transition is… well, it’s extraordinary. You ascend to the upper tiers of the city by climbing the gallery of a cathedral, a darkened interior with light provided by the gorgeous stained glass in the background. It’s far more visually arresting than anything to have appeared in a previous Castlevania game (including Vampire Killer and Haunted Castle). And, again, it’s also much more dangerous than anything in the first stage of Castlevania.
The screen scrolls upward through stairs and platforms, leaving a number of open gaps through which Trevor can fall to his death. And while bats appear here, they’re trickier than in Castlevania’s opening areas: Rather than drift past on a timer, they hang almost completely hidden from the ceiling and duck down to attack when Trevor comes close—which usually happens as you’re climbing the stairs. Resultantly, you need to take two important lessons away from here. One, you’re slow and vulnerable while climbing stairs, and the game will take advantage of this fact. Secondly, upward scrolling is one-way only and, as in Kid Icarus, there’s no way to go backward without dying. This is a slightly strange design decision (as it clearly wasn’t done for technical reasons; Metroid allowed bi-directional vertical scrolling before the original Castlevania debuted), but much of the challenge of certain stages revolves around it… and it’s never implemented unfairly, just brutally.
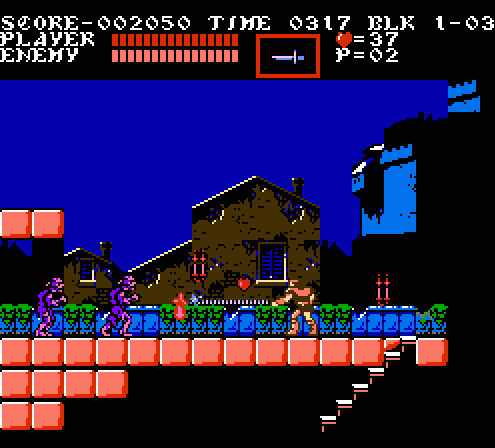
Beyond the cathedral interior the remainder of the level plays out with more or less consistent graphics, though already you can see the one area where Dracula’s Curse represents a step backward from Castlevania: The actual placement and structure of stage graphics lack the consistency and sense of place of the first game. The layout doesn’t really work when you stop and think about it: You come in on the ground floor of a cathedral, climb to an upper level through the tower, and once you reach the top… there’s more exterior for you, meaning the church doesn’t tower over the city but is somehow built into a cliffside or connects to the bulk of the city via a bridge to the tower’s top. In Block 1-02, you begin to encounter platforms floating inexplicably in the air with no support, something Castlevania never did. There’s a move away from architectural logic toward typical game design, which is a shame. Sure, it’s a petty thing to complain about, but when the first game did it so well you can’t help but lament its loss here.
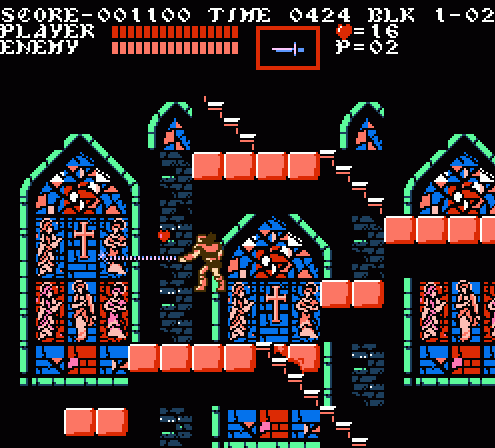
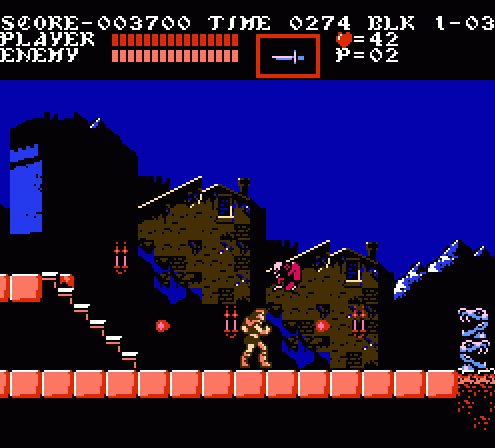
The game doesn’t really give you time to lament the difference, though, because before you’re even through with Block 1-01 you’re already dealing with Medusa Heads and an entirely new hazard: Flipping blocks. Visually, these resemble the moving blocks of the first game, but they’re not mobile on their own power. Instead, they rotate under Trevor’s weight, dropping him through to the lower level. There’s a trick to them, though; they only flip if Trevor jumps on them. Simply walking over top of them doesn’t upset them. And if you do have to jump on them, you’re given a split-second of sure footing before you’re dumped to the bottom tier so you can leap immediately to safety.
This is the first real “tutorial” moment of the game, and it works nicely. You could walk briskly to safety across the top level under normal circumstances, but Dracula’s Curse trots out the Medusa Heads here to harass you. They behave exactly as in the first game (flying in parabolic arcs centered on your position when they spawn, rather than drifting slowly straight toward you as in Simon’s Quest) and force you to consider both your footing and their movement and timing as you advance. Your natural instinct with Medusa Heads is usually to jump over them, but if you try that here you’re likely to plummet to the bottom level as the final run-up to the end of Block 1-01 consists primarily of these spinning platforms.
The game does a really good job of teaching you what to do and upping the stakes in just a few short screens. The first revolving block appears as an alternate shortcut to the lower level next to a staircase. You can walk over it and nothing will happen, but if you jump onto it you’ll fall to the level below, which is the path forward. If you stick to the lower level, though, you’ll reach a dead end; the passage to Block 1-02 is above, where the flooring is much less stable. Once you climb the stairs upward, though, the Medusa Heads appear. The first two revolving platforms on the upper level reside above solid ground, so if you lose your nerve and jump to avoid the enemies, you’ll land safely below and can backtrack to the upper level.
The final stretch, however, consists of two adjacent spinning platforms, which requires careful timing. You need to hurry across the unstable ground (either by walking or quickly jumping) while observing and avoiding the Medusa Heads. To up the stakes, the first shaky platform stands directly above a second one directly below, meaning that if you fall here and don’t jump away immediately after landing, you’ll fall to your death. The prospects of this happening are fairly slim, though, as if you jump you’re more likely to leap to the second platform, which will dump you onto solid ground; the stacked platforms are really there to test your courage and create a sense of danger without being a genuine threat. The real danger is that you let yourself get smacked by a Medusa Head and knocked back into the first platform, dropping your helplessly to your death—a hard lesson, but one you definitely need to learn in a Castlevania game. You need to learn to navigate these hazards, but Dracula’s Curse lets you get a handle on it without being unreasonably harsh about it right away.
This is the first third of the first level of this game. Clearly, Castlevania III isn’t messing around.
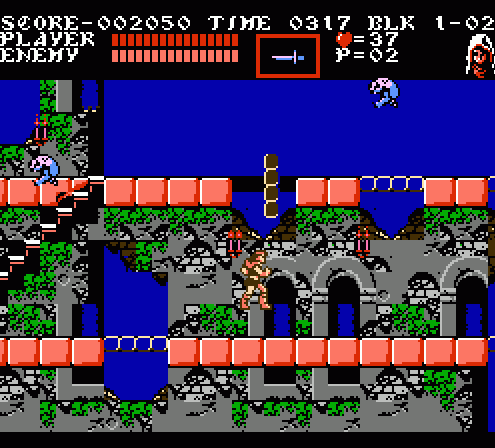
You can parse Block 1-01 as the ruins of a cathedral (with the stained glass tower ascent marking the last standing portion of it), while Block 1-02 is the town proper. The structure here is considerably less complicated and initially pits you against the sort of threats you faced in Block 01 of Castlevania: Shambling zombies on flat ground with a single pitfall to leap. The second half, which takes place on lower ground, throws you back against higher level threats: Flea Men and Dragon Skull Cannons. Neither is impossibly difficult, but the rapid movements of the Flea Men could very likely catch a player unaware this early in the game. They require quick action and responses to beat, while the Cannon demands precisely the opposite: You need to stand your ground and counter its flame attacks with careful timing.
The background graphics here do reflect some of the Castlevania commitment to consistency: The tall, castle-like structure in the background (which presumably is some element of the town and not Dracula’s castle itself) remains consistent across the two “layers” of this stage, with the same basic graphic shifting upward once you climb down to the lower section to reflect Trevor’s change in perspective. That’s pretty nice.
Finally, Block 1-03 provides the very brief finale before facing off against the first boss. Here you journey through the town’s cemetery, fighting a handful of zombies and bats, before reaching the Skeleton Knight who awaits at the end. It’s all very straightforward and provides the player with just enough tools to power up in the event they die against the boss and have to restart: You can charge up the whip to maximum power, grab a crummy sub weapon, and go to town.
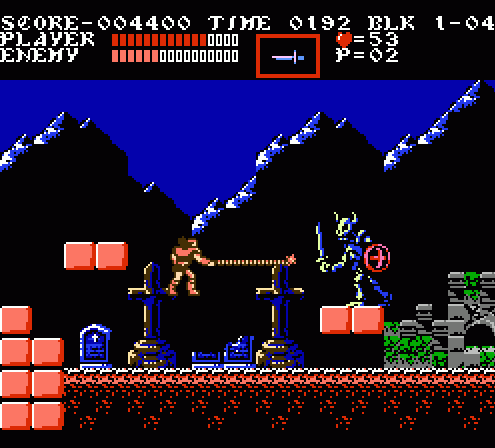
The Skeleton Knight is moderately tough for a first boss. Certainly it’s more of a threat than the big bat from Castlevania’s first stage, capable of leaping and attacking with a respectable range. Accordingly, the area layout is more complex, offering the player greater maneuverability: You can hop on the (detached, floating) blocks to the right in order to kneel and whip the guy in the head as he approaches before jumping over him once you’re cornered, or climb the left side to avoid him. The high, leftmost platform is a little bit of a potential trap as you can’t actually attack the Skeleton Knight from there, but he can actually jump and hit you. It’s best used as a spot from which to leap to safety when you’re cornered and nothing more.
All in all, there’s a lot happening here considering it’s the first level of the game. Dracula’s Curse makes its increased complexity over the original Castlevania clear from the very beginning. The game only grows more difficult from here, though fortunately it also provides the player with sophisticated tools to help conquer the challenges on offer.
I have to wrap my head around this block stuff. I always just thought of it as Level 1.
Great work! I really enjoy these articles that enable me to think about old favorites in new ways, and in many ways to appreciate the intelligence of their design in ways that we took for granted.
I didn’t get into the series until the Playstation edition, and subsequently went back through the Super Famicom, Mega Drive, and PC Engine until finally conquering the Famicom originals. Since I’d been primed by fighting through the first game, I don’t think I realized just what a step up in complexity and difficulty the third entry was until this wonderful write-up. It stands to reason, though, since in going back to attempt to help a stranded friend playing it on Virtual Console, I was taken down in spite of having felt the game to be simple enough when I first played it.
You sir, are a national treasure. Of Transylvania and Hyrule, anyway.
Hold a tic - is Skeleton Knight’s room layout the same as Creature + Igor from C1?
Tomm: Nope! http://telebunny.net/toastyblog/2012/08/2d-castlevania-stages-10-12/
The first stage of Castlevania III is definitely a step up in difficulty from Castlevania I. The worst you had in that was the mermen over a few water platforms; here you have Medusa Heads that can send you flying on a pressure platform flipping you to your doom if you’re not careful.
But anyway, the boss…While the bosses in Harmony of Dissonance didn’t have much onhand to deal with a guy who can quick dash in either direction, I really liked that it had new takes on a few of Castlevania III’s old bosses when it wasn’t making you fight giant versions of monsters. The Skull Knight was one of them, first attacking with his sword then shifting to dash attacks and defense when only with his shield and giant laser beams from his chest when he had neither.
The interior Cathedral section is one of my favorites of all of 8-bitdom.
Are you playing the Japanese version? I’m sure you know, but it has much richer, fuller music. Also, Grant’s main weapon is better IIRC.