Bionic Commando doesn’t want you to rescue a princess or a damsel in distress; instead, the plot revolves around saving some old guy from captivity. This was clearly a game designed when ’80s action movie stars were still in their prime. The glass ceiling of viable heroism hadn’t begun to shift upward to accommodate the entire cast of The Expendables back in 1988.
Here at last in Area 7, you’ll find your mission objective, who’s been shuffled about the Empire’s territory to create a moving target. But Bionic Commando takes a page from Dragon Quest — saving the captive only serves as the introduction to the fight against the true villain of the piece. But I’m getting ahead of myself.
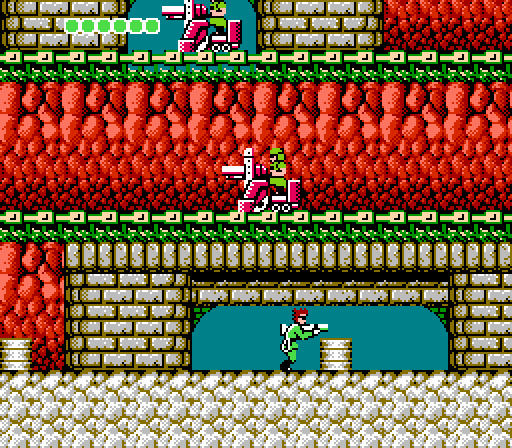
The entrance to Area 7 presents you with an obstruction that you can only clear by conquering Area 9. Perhaps because of that mechanical link, the two stages share a common design spirit here at the beginning: You immediately find yourself dealing with multiple parallel tracks roamed by dangerous vehicles. Unlike the tracked devices in Area 9, however, the ones in Area 7 are manned rather than automated. This means, one, they move back and forth; and two, the dudes driving them occasionally fire large shells at you.
These armored vehicles can’t be damaged from the front side, even if you exit the stage and return with the rocket launcher. Instead, you have to hit them from behind… though hitting them from below and above works as well. Conveniently, the 3-Way gun you need in order to shatter the entry barrier is quite good at doing precisely that. It’s a nice little design choice to place vehicles weak to the level’s requisite weapon within that level — though it’s still up to you to make the connection that your tri-directional fire blasts can indeed hit foes on a different level of the stage from you.
As with all the Empire’s vehicles, these mini-tanks are driven by, um, the vertically challenged. This raises the question of where the army managed to recruit so many incredibly short soldiers. Maybe it’s something in the drinking water.
The patrolling tanks create a fairly unbreakable front in the lower portions of the stage. You can choose to advance along any of the tracks, but all except the lowest track is guarded by these machines that can’t be destroyed from the front and can’t easily be swung past, either. You can struggle with a frontal assault if you like, but ultimately your best bet is to advance along the lowest level and double back to blow up the tanks. Or even just ignore them… though it’s really to your advantage to clear them out before advancing.
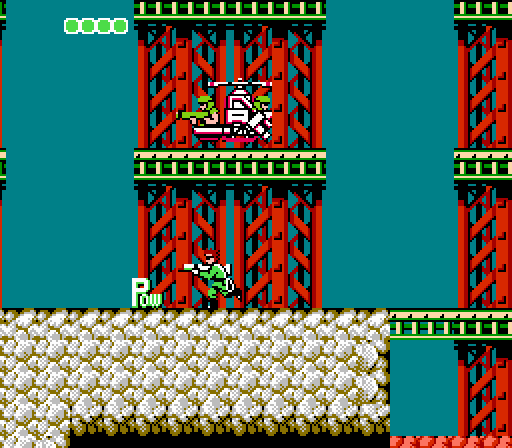
That’s because, you see, the area above the tracks is bonkers hard — the most challenging sequence in the game outside of that extended chain of swings in Area 6. In fact, if it were as unforgiving as the sequence in Area 6, this would be the single most difficult part of the game. Thankfully, while you need to make an even lengthier sequence of tricky swings here, failure doesn’t send you plummeting into a bottomless pit of death. Instead, you get sent back to the beginning of the stage to fight your way back up. It’s a little frustrating, but if you clear out the tanks before attempting the swing, at least it’s quick and easy to climb back up for a second attempt.
What makes this portion particularly difficult is the presence of these odd little helicopters, once again piloted by remarkably short enemy soldiers. These behave much like the individual flying soldiers in Area 5, hovering about and infinitely respawning upon defeat, but with a few notable differences. For starters, they don’t use that locked-in pattern where they strafe horizontally; instead, they constantly move about, fairly erratically, which makes their actions much harder to predict. Secondly, the choppers only explode after several shots, and once they do they eject one of the mini-soldiers to walk around and harass you.
And there is some hardcore harassment going on here. You need to climb a tower at the upper right of the stage to reach the overhead wires that will allow you to grapple to your objective to the upper left, and the entire time these jerks are bugging you.
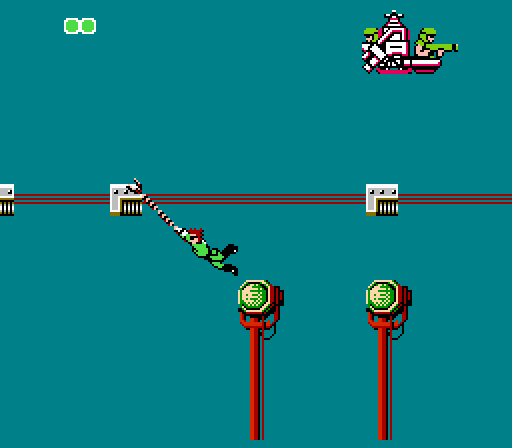
They don’t go away just because you’re swinging desperately across a wide gulf, swinging vigorously for tiny grapple points with very little chance to rest and reorient. The one saving grace here comes in the form of a platform midway through the stage, which will break your landing if you fall and let you regroup for the second half of the swing sequence. But even that’s a little trick to deal with: To reach the overhead blocks from the platform, you need to climb up on top of one of those slippery search lamps and snag the nearest block in the split-second before you fall off.
If you mess up, you’ll fall a long, long way and have to return to the towers by way of the tank tracks. So the trick is not to fall.
Once you do make your way across the chasm, you’ll be greeted by another Robocop guy. It’s not simply enough to destroy a reactor here; you have to defeat the enemy’s bionic giant in order to rescue Joe. There’s a definite trade-off to this stage. The 3-Way gun is huge helpful against the tanks and the choppers, but it makes this fight terribly difficult. You have to shoot the giant in the face, and the short range of the 3-Way fire means you have to get in close to do that. And no, you can’t use the tank trick and hit him from above; his bionic gear blocks fire from above, and on top of that any time you pass within the line of fire of his three-directional grappling equipment, he’ll immediately grab you. So that’s pretty much a suicide approach.
The rocket launcher will take him out in just a few shots, but the flip side of that tactic is that you need to survive the stage equipped with the rocket launcher. The mini-choppers make that a tremendous pain.
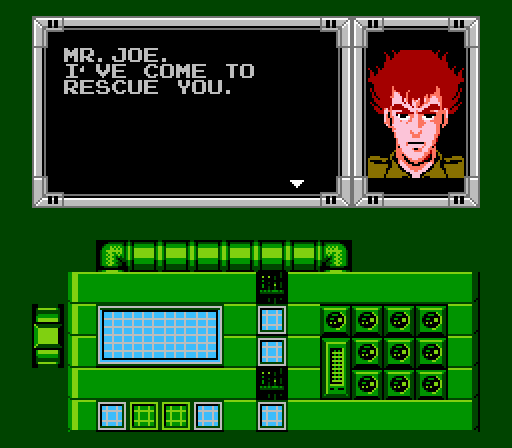
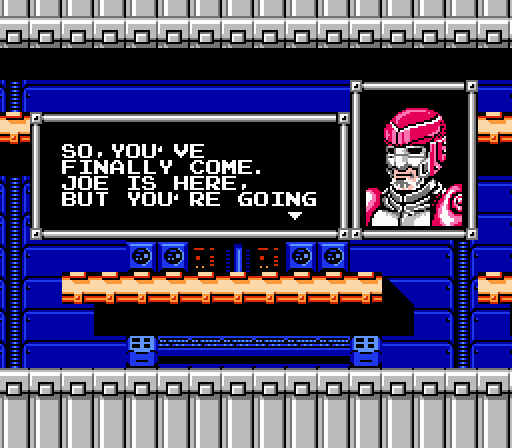
So, in short, it’s a powerfully challenging stage, as befits the culmination of your primary objective. But the reward is a bit of exposition as Captain Spencer speaks for the first time — and so politely!
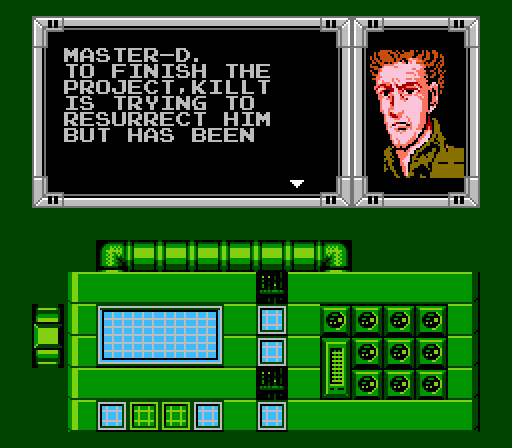
Joe, in return, lets you know what the game’s real plot is about. Admittedly this twist would have more impact if they had called Master-D by his actual name (Adolf Hitler), but Nintendo was really cagey about dropping direct references to Hitler in the NES days. Between this and Golgo-13, dude had an impressive collection of aliases. The mustache is always a dead giveaway, though.
With Joe rescued, the final leg of the adventure opens up for conquest. And, really, the most difficult sequences in the game are out of the way.